This is the multi-page printable view of this section. Click here to print.
Workflows
- 1: Where are the Workflows
- 2: Workflow Explorer
- 3: Create Workflow
- 4: Duplicate a Workflow
- 5: Copy & Paste steps
- 6: Change the order of steps in a workflow
- 7: Run a workflow
- 8: Running one step in a workflow
- 9: Running a range of steps in a workflow
- 10: Managing Step Errors
- 11: Continue on Error
- 12: Skip steps in a workflow
- 13: Conditional Step Execution
- 14: Controlling Parallel Execution
- 15: Manage Workflow Variables
- 16: Viewing Workflow Log
- 17: View Workflow Report
- 18: View a dependency audit
1 - Where are the Workflows
Workflows exist within a Project. From the top menu in the Analyze menu click on the Projects menu item. This will open the Projects hierarchy showing the list of projects. Open the project and navigate to the Workflows tab to see the workflows in the project. Workflows are organized in a hierarchy.
The list of projects you can see is determined by your access security for each project and your Viewing Role within the project (i.e. Architect, Manager, or Explorer). If you are expecting to see a project and it is not present, it could be that you have not been granted access to the project by one of the project owners. If you are expecting to see certain workflows, but you are not an Architect on the project, then they might be hidden from your viewing role.
The status of the workflow will be displayed if it is running, has a warning or error, or was completed normally. The creation and update dates are also shown along with who created or updated the workflow.
The Workflow Explorer can be opened by double clicking on a workflow. You can then view the steps, execute a workflow or a part of a workflow, and so on.
2 - Workflow Explorer
To view the details within a workflow, find it in the project and then double click on it to open up the workflow in the explorer.
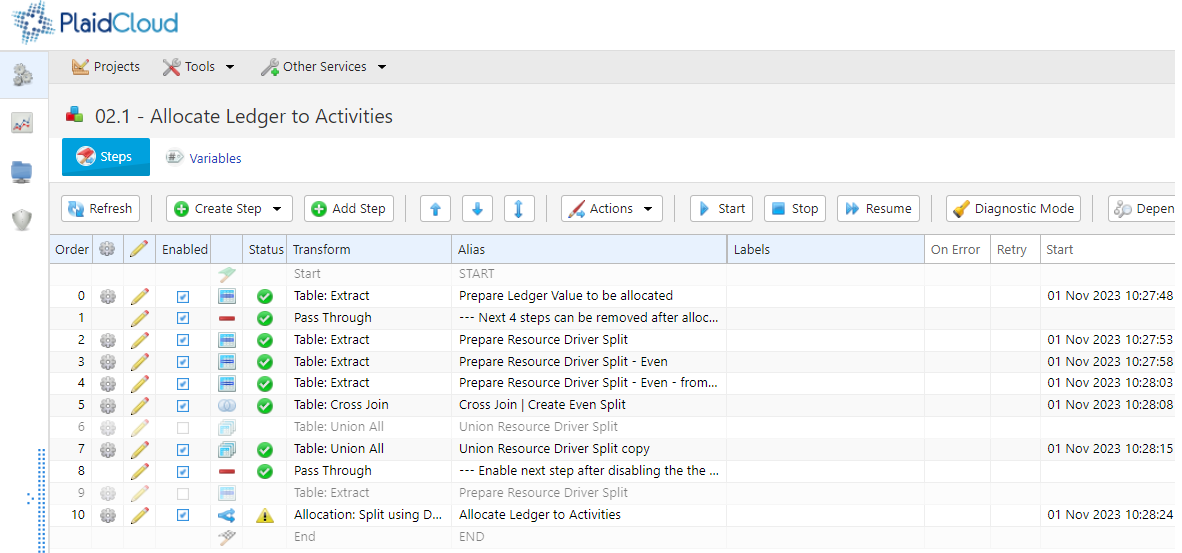
From here, you can manage Workflow Steps including creating or modifying existing workflow steps, changing the order, executing steps, and so on.
3 - Create Workflow
Once you navigate to the Workflows tab in a project, click on the New Workflow button. This will open a form where you can enter in the details of the workflow including the name and memo.
In addition, you can set a remediation workflow to run if the workflow ends in an error. A remediation workflow does not need to be set but can be useful for sending notifications or triggering other processes that may automatically remediate failures.
Once the form is complete, click on the Create button and the new workflow will be added to the project.
4 - Duplicate a Workflow
It may be useful to copy a workflow when planning to make major changes or to replicate the process with different options. Duplicating an entire workflow is very easy in PlaidCloud. Simply select the workflows you would like to duplicate in the Workflows table of a selected project and click the Duplicate Selected Workflows button at the top of the table. This will copy the workflows and append the word Copy to the name.
Once the duplication process is complete, the workflow is fully functional. Copied workflows are completely separate from the original and can be modified without impacting the original workflow.
5 - Copy & Paste steps
Copy Steps
It is often useful to copy steps instead of starting from scratch each time. PlaidCloud allows copying steps within workflows as well as between workflows, and even in other projects. You can select multiple steps to copy at once. Select the workflow steps within the hierarchy and click the Copy Selected Steps button at the top of the table.
This will place the selected steps in the clipboard and allow pasting within the current workflow or another one.
Copying a step will make a duplicate step within the project. If you want to place the same step in more than one location in a workflow, use the Add Step menu option to add a reference to the same step rather than a clone of the original step.
Paste Steps
After selecting steps to copy and placing them on the clipboard, you can paste those steps into the same workflow or another workflow, even in another project. There are two options when pasting the steps into the workflow:
- Append to the end of the workflow
- Insert after last selected row
The append option will simply append the steps to the end of the selected workflow. The insert option will insert the copied steps after the selected row. Note that if multiple steps have been copied to the clipboard from multiple areas in a workflow, that pasting them will paste them in order but will not have any nested hierarchy information from when they were copied. The pasting will be a flat list of steps to insert only. This might be unexpected but is safer than creating all of the directory structure in the target workflow that existed in the source workflow.
6 - Change the order of steps in a workflow
There are two ways to update the order of steps in the workflow. The first way is to use the up and down arrows present in the Workflows table to move the step up or down. The second way is to use the Step Move option which allows you to move the step much easier if large changes are necessary. The step move option allows you to move the step to the top, bottom, or after a specific step in one operation.
7 - Run a workflow
You can trigger a full workflow run by either clicking on the run icon from the Workflows hierarchy or by selecting Run All from the Actions menu within a specific workflow.
You can also click on the Toggle Start/Stop button at the top of the workflow table. This toggle button will stop a running workflow or start a workflow.
8 - Running one step in a workflow
During initial workflow development, testing, or troubleshooting, it is often useful to run steps individually. To run a single step in isolation, right click on the step and select Run Step from the context menu.
9 - Running a range of steps in a workflow
While running individual steps is useful, it also may be useful to run subsets of an entire workflow for development, testing, or troubleshooting. To run a subset of steps, select all the steps you would like to run and select Run Selected from the Actions menu at the top of the workflow steps hierarchy. This will trigger a normal workflow processing but start the workflow at the beginning of the selected steps and stop once the last selected step is complete.
10 - Managing Step Errors
If a workflow experiences an error during processing, an error indicator is displayed on both the workflow and the step that had the error. PlaidCloud can retry a failed step multiple times. This is often useful if the step is accessing remote systems or data that may not be highly available or intermittently fail for unknown reasons. The retry capability can be set to retry many times as well as add a delay between retries from seconds to hours.
If no retry is selected or the maximum number of retries is exceeded, then the step will be marked as an error. PlaidCloud provides three levels of error handling in that case:
- Stop the workflow when an error occurs
- Mark the step as an error but keep processing the workflow
- Mark the step as an error and trigger a remediation workflow process instead of continuing the current workflow
Stop the Workflow
Stopping the workflow when a step errors is the most common approach since workflows generally should run without errors. This will stop the workflow and present the error indicator on both the step and the workflow. The error will also be displayed in the activity monitor but no further action is taken.
Keep Processing
Each step can be set to continue on error in the step form. If this checkbox is enabled, then any step will be marked with an error if it occurs, but the workflow will treat the error as a completion of the step and continue on. This is often useful if there are steps that perform tasks that can error when there is missing data but are harmless to the overall processes.
Since the workflow is continuing on error under this scenario the workflow will not display an error indicator and continue to show a running indicator.
Trigger Remediation Workflow
With the ability to set a remediation workflow as part of the workflow setup, a workflow error will immediately stop the processing of the current workflow and start processing the remediation workflow. Note that if a step is marked to continue on error that a failure will not trigger the remediation workflow. Only steps that fail that would also cause the entire workflow to stop will trigger the remediation process.
A remediation workflow may be useful for simply notifying people that a failure has occurred or it can perform other complex processing to attempt an automatic correction of any underlying reasons the original workflow failed.
11 - Continue on Error
Workflow steps can be set to continue processing even when there is an error. This might be useful in workflow start-up conditions or where data may be available intermittently. If the step errors, it will be recorded as an error but the workflow will continue to process.
To set this option, click on the step edit option, the pencil icon in the workflow table, to open the edit form. Check the checkbox for Continue On Error. After saving the updated step, any errors with the step will not cause the workflow to stop.
Steps that have been set to continue on error will have a special indicator in the workflow steps hierarchy table.
12 - Skip steps in a workflow
Steps in the workflow can be set to skip during the workflow run. This may be useful if there are debugging steps or old steps that you are not prepared to completely remove from the workflow yet. To set this option, you have two options:
- Edit the step form
- Uncheck the enabled checkbox in the workflow hierarchy
To edit the step form, click on the step edit option, the pencil icon in the workflow table, to open the edit form. Uncheck the enabled checkbox. After saving the updated step it will no longer run as part of the workflow but can still be run using the single step run process.
Steps that have been set to disabled will have a disabled indicator in the workflow steps hierarchy table.
13 - Conditional Step Execution
Overview
Workflow steps normally execute in the defined order for the workflow. However, it is often useful to have certain steps only execute if predefined conditions are met. By using the step conditions capability you can control execution based on the following options:
- Variable values
- Table has rows or is empty
- A document or folder exists in Document
- A document or folder is missing in Document
- Table query result
- Date and time conditions are met
For variables or table query result comparisons you can use the following comparisons:
- Equal
- Does not equal
- Contains
- Does not contain
- Starts with
- Ends with
- Greater than
- Less than
- Greater than or equal
- Less than or equal
What is also important to note is that you can have multiple conditions that must be met in order for the step to execute. This provides a powerful tool for controlling exactly when a step should execute.
Adding and Controlling Conditions
To activate and add conditions on a step:
- Find the step you want to add a condition on
- Click the Edit Step Details (pencil) icon
- Select the Conditions tab.
- Check the Check Conditions Before Running checkbox to enable the dialog and add conditions.
- In the Condition Checks section on the left, select the "+" to add a New Condition
- Add a condition from the tabbed section on the right
- Repeat steps 5,6 as needed to add all your conditions
Managing Conditions
You can add as many conditions as necessary in the Conditions Check section. As you add them, it is a good idea to give them a useful name so you can find the conditions easily in the future.
Once you add a condition, select it on the left and the condition evaluation criteria will be editable on the right.
Variable Conditions
When checking variable conditions, the Value Check Parameters section must be completed so a comparison can be made.
In the Variable or Table Field fill in the variable name. Select a comparison type and enter a comparison value.
Basic Table Conditions
If the condition is checking whether a table has rows or is empty, you will also need to define the table in the Table Data Selection tab.
Advanced Table Conditions
When using Advanced Table conditions, the Value Check Parameters section must be completed so a comparison can be made.
In the Variable or Table Field fill in the field name from the table selection. Select a comparison type and enter a comparison value.
In the Table Data Selection tab, select the table and complete the data mapping section with at least the field referenced for the condition comparison.
Document Path Conditions
If the condition is checking whether a document or folder exists, this requires picking the Document account and specifying the document path to check in the Document Path tab.
Date and Time Conditions
For Date or Time selections you can add multiple conditions if a combination of conditions is necessary. For example, if you only wanted a step to run on Mondays at 2:05am, you would create three conditions:
- Day of the week condition set to Monday (1)
- Hour of the day set to 2
- Minute of the hour set to 5
For "Use Financial Close Workday", set that to the xth day of the month that your close happens on. For example, if your close happens on the 5th day of the month, have "5".
14 - Controlling Parallel Execution
Workflows in PlaidCloud can be executed as a combination of serial steps and parallel operations. To set a group of steps to run in parallel, place the steps in a group within the workflow hierarchy. Right click on the group folder and select the Execute in Parallel option. This will allow all the steps in the group to trigger simultaneously and execute in parallel. Once all steps in the group complete, the next step or group in the workflow after the group will activate.
15 - Manage Workflow Variables
PlaidCloud allows variables at both the project scope and workflow scope. This allows for setting project wide variables or being able to pass information easily between workflows. The variables and values are viewed by clicking on the variables icon in the Workflows hierarchy.
From the variables table you can view the variables, the current values, and edit the values. You can also add new variables or delete existing ones.
16 - Viewing Workflow Log
Viewing the Workflow Log
As things happen within a workflow, such as steps running or warnings occurring, those events are logged to the workflow log. This log is viewable from the Project area under the Log tab. The workflow log is also present in the project log in case you would like to see a more comprehensive view of logs across multiple workflows.
The log viewer allows for sorting and filtering the log as well as viewing the details of a particular log entry.
Clearing the Workflow Log
Clearing the workflow log may be desirable from time to time. From the log viewer, select the Clear Log button. This will clear the log based on the workflow selected which will also remove the log entries from the project level log too.
17 - View Workflow Report
Maintaining detailed documentation to support both statutory and management requirements is challenging when the projects and workflows may be dynamic. To help solve this problem, PlaidCloud provides a Workflow level report that provides detailed documentation of workflows, workflow steps, user defined functions, and variables.
The report is generated on-demand and reflects the current state of the workflow. To download the report click on the Report icon in the Workflows hierarchy.
18 - View a dependency audit
The Workflow Dependency Audit is a very helpful tool to understand data and workflow dependencies in complex interconnected workflows. Over time, as workflow processes become more complex, it may become challenging to ensure all dependencies are in the correct order. When data already exists in tables, steps will run and appear correct in many cases but may actually have a dependency issue if the data is populated out of order.
This tool will provide a dependency audit and identify issues with data dependency relationships.