This is the multi-page printable view of this section. Click here to print.
Import Steps
- 1: Import Archive
- 2: Import CSV
- 3: Import Excel
- 4: Import External Database Tables
- 5: Import Fixed Width
- 6: Import Google BigQuery
- 7: Import Google Spreadsheet
- 8: Import HDF
- 9: Import HTML
- 10: Import JSON
- 11: Import Project Table
- 12: Import Quandl
- 13: Import SAS7BDAT
- 14: Import SPSS
- 15: Import SQL
- 16: Import Stata
- 17: Import XML
1 - Import Archive
Description
Imports PlaidCloud table archive.
Examples
No examples yet...
Import Parameters
The file selector in this transform allows you to choose a file stored in a PlaidCloud Document location for import.
You can also choose a directory to import and all files within that directory will be imported as part of the transform run.
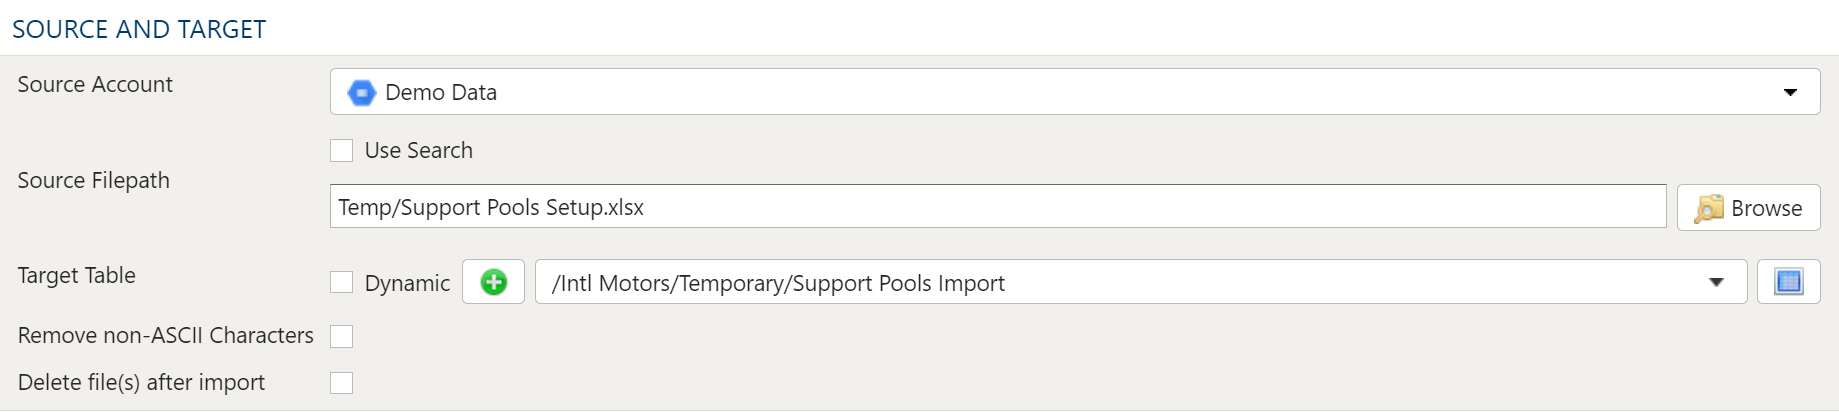
Source Account
Choose a PlaidCloud Document account for which you have access. This will provide you with the ability to select a directory or file in the next selection.
Search Option
The Search option allows for finding all matching files below a specified directory path to import. This can be particularly useful if many files need to be included but they are stored in nested directories or are mixed in with other files within the same directory which you do not want to import.
The search path selected is the starting directory to search under. The search process will look for all files within that directory as well as sub-directories that match the search conditions specified. Ensure the search criteria can be applied to the files within the sub-directories too.
The search can be applied using the following conditions:
- Exact: Match the search text exactly
- Starts With: Match any file that starts with the search text
- Contains: Match any file that contains the search text
- Ends With: Match any file that ends with the search text
Source FilePath
When a specific file or directory of files are required for import, picking the file or directory is a better option than using search.
To select the file or directory, simply use the browse button to pick the path for the Document account selected above.
Variable Substition
For both the search option and specific file/directory option, variables can be used with in the path, search text, and file names.
An example that uses the current_month variable to dynamically point to the correct file:
legal_entity/inputs/{current_month}/ledger_values.csv
Target Table
The target selection for imports is limited to tables only since views do not contain underlying data.
Dynamic Option
The Dynamic option allows specification of a table using text, including variables. This is useful when employing variable driven workflows where table and view references are relative to the variables specified.
An example that uses the current_month variable to dynamically point to target table:
legal_entity/inputs/{current_month}/ledger_values
Static Option
When a specific table is desired as the target for the import, leave the Dynamic box unchecked and select the target Table.
If the target Table does not exist, select the Create new table button to create the table in the desired location.
Table Explorer is always avaible with any table selection. Click on the Table Explorer button to the right of the table selection and a Table Explorer window will open.
Remove non-ASCII Characters Option
By selecting this option, the import will remove any content that is not ASCII. While PlaidCloud fully supports Unicode (UTF-8), real-world files can contain all sorts of encodings and stray characters that make them challenging to process.
If the content of the file is expected to be ASCII only, checking this box will help ensure the import process runs smoothly.
Delete Files After Import Option
This option will allow the import process to delete the file from the PlaidCloud Document account after a successful import has completed.
This can be useful if the import files are generated can be recreated from a system of record or there is no reason to retain the raw input files once they have been processed.
2 - Import CSV
Description
Import delimited text files from PlaidCloud Document. This includes, but is not limited to, the following delimiter types:
- comma (, )
- pipe (|)
- semicolon (; )
- tab
- space ( )
- at symbol (@)
- tilda (~)
- colon (:)
Examples
No examples yet...
Import Parameters
The file selector in this transform allows you to choose a file stored in a PlaidCloud Document location for import.
You can also choose a directory to import and all files within that directory will be imported as part of the transform run.
Source Account
Choose a PlaidCloud Document account for which you have access. This will provide you with the ability to select a directory or file in the next selection.
Search Option
The Search option allows for finding all matching files below a specified directory path to import. This can be particularly useful if many files need to be included but they are stored in nested directories or are mixed in with other files within the same directory which you do not want to import.
The search path selected is the starting directory to search under. The search process will look for all files within that directory as well as sub-directories that match the search conditions specified. Ensure the search criteria can be applied to the files within the sub-directories too.
The search can be applied using the following conditions:
- Exact: Match the search text exactly
- Starts With: Match any file that starts with the search text
- Contains: Match any file that contains the search text
- Ends With: Match any file that ends with the search text
Source FilePath
When a specific file or directory of files are required for import, picking the file or directory is a better option than using search.
To select the file or directory, simply use the browse button to pick the path for the Document account selected above.
Variable Substition
For both the search option and specific file/directory option, variables can be used with in the path, search text, and file names.
An example that uses the current_month variable to dynamically point to the correct file:
legal_entity/inputs/{current_month}/ledger_values.csv
Target Table
The target selection for imports is limited to tables only since views do not contain underlying data.
Dynamic Option
The Dynamic option allows specification of a table using text, including variables. This is useful when employing variable driven workflows where table and view references are relative to the variables specified.
An example that uses the current_month variable to dynamically point to target table:
legal_entity/inputs/{current_month}/ledger_values
Static Option
When a specific table is desired as the target for the import, leave the Dynamic box unchecked and select the target Table.
If the target Table does not exist, select the Create new table button to create the table in the desired location.
Table Explorer is always avaible with any table selection. Click on the Table Explorer button to the right of the table selection and a Table Explorer window will open.
Remove non-ASCII Characters Option
By selecting this option, the import will remove any content that is not ASCII. While PlaidCloud fully supports Unicode (UTF-8), real-world files can contain all sorts of encodings and stray characters that make them challenging to process.
If the content of the file is expected to be ASCII only, checking this box will help ensure the import process runs smoothly.
Delete Files After Import Option
This option will allow the import process to delete the file from the PlaidCloud Document account after a successful import has completed.
This can be useful if the import files are generated can be recreated from a system of record or there is no reason to retain the raw input files once they have been processed.
Inspect Selected Source File
By pressing the Guess Settings from Source File button, PlaidCloud will open the file and inspect it to attempt to determine the data format. Always check the guessed settings to make sure they seem correct.
Data Format
Delimiter
As mentioned above, Inspect Source File will attempt to determine the delimiter in the source file. If another delimiter is desired, use this section to specify the delimiter. Users can choose from a list of standard delimiters.
- comma (, )
- pipe (|)
- semicolon (; )
- tab
- space ( )
- at symbol (@)
- tilda (~)
- colon (:)
Header Type
Since CSVs may or may not contain headers, PlaidCloud provides a way to either use the headers, ignore headers, or use column order to determine the column alignment.
- No Header: The CSV file contains no header. Use the source list in the Data Mapper to determine the column alignment
- Has Header - Use Header and Override Field List: The CSV file has a header. Use the header names specified and ignore the source list in the Data Mapper.
- Has Header - Skip Header and Use Field List Instead: The CSV file has a header but it should be ignored. Use the header names specified by the source list in the Data Mapper.
Date Format
This setting is useful if the dates contained in the CSV file are not readily recognizable as dates and times. The import process attempts to convert dates but having a little extra information can help in the import process.
Special Characters
The special character inputs control how PlaidCloud handles the presence of certain characters and what they mean in the context of processing the CSV
- Quote Character: This is the character used to indicate an enclosed set of text that should be processed as a single field
- Escape Character: This is the character used to indicate the following character should be processed as it is and not interpreted as a special character. Useful when field may contain the delimiter.
- Null Character: Since CSVs don't have data types, this character provides a way to indicate that the value should be NULL rather than an empty string or 0.
- Trailing Negatives: Some source systems generate negative numbers with trailing negative symbols instead of prefixing the negative. This setting will process those as negative numbers.
Row Selection
For input files with extraneous records, you can specify a number of rows to skip before processing the data. This is useful if files contain header blocks that must be skipped before arriving at the tabular data.
Table Data Selection
Data Mapper Configuration
The Data Mapper is used to map columns from the source data to the target data table.
Inspection and Populating the Mapper
Using the Inspect Source menu button provides additional ways to map columns from source to target:
- Populate Both Mapping Tables: Propagates all values from the source data table into the target data table. This is done by default.
- Populate Source Mapping Table Only: Maps all values in the source data table only. This is helpful when modifying an existing workflow when source column structure has changed.
- Populate Target Mapping Table Only: Propagates all values into the target data table only.
If the source and target column options aren’t enough, other columns can be added into the target data table in several different ways:
- Propagate All will insert all source columns into the target data table, whether they already existed or not.
- Propagate Selected will insert selected source column(s) only.
- Right click on target side and select Insert Row to insert a row immediately above the currently selected row.
- Right click on target side and select Append Row to insert a row at the bottom (far right) of the target data table.
Deleting Columns
To delete columns from the target data table, select the desired column(s), then right click and select Delete.
Changing Column Order
To rearrange columns in the target data table, select the desired column(s). You can use either:
- Bulk Move Arrows: Select the desired move option from the arrows in the upper right
- Context Menu: Right clikc and select Move to Top, Move Up, Move Down, or Move to Bottom.
Reduce Result to Distinct Records Only
To return only distinct options, select the Distinct menu option. This will toggle a set of checkboxes for each column in the source. Simply check any box next to the corresponding column to return only distinct results.
Depending on the situation, you may want to consider use of Summarization instead.
The distinct process retains the first unique record found and discards the rest. You may want to apply a sort on the data if it is important for consistency between runs.
Aggregation and Grouping
To aggregate results, select the Summarize menu option. This will toggle a set of select boxes for each column in the target data table. Choose an appropriate summarization method for each column.
- Group By
- Sum
- Min
- Max
- First
- Last
- Count
- Count (including nulls)
- Mean
- Standard Deviation
- Sample Standard Deviation
- Population Standard Deviation
- Variance
- Sample Variance
- Population Variance
- Advanced Non-Group_By
For advanced data mapper usage such as expressions, cleaning, and constants, please see the Advanced Data Mapper Usage
Data Filters
To allow for maximum flexibility, data filters are available on the source data and the target data. For larger data sets, it can be especially beneficial to filter out rows on the source so the remaining operations are performed on a smaller data set.
Select Subset Of Data
This filter type provides a way to filter the inbound source data based on the specified conditions.
Apply Secondary Filter To Result Data
This filter type provides a way to apply a filter to the post-transformed result data based on the specified conditions. The ability to apply a filter on the post-transformed result allows for exclusions based on results of complex calcuations, summarizaitons, or window functions.
Final Data Table Slicing (Limit)
The row slicing capability provides the ability to limit the rows in the result set based on a range and starting point.
Filter Syntax
The filter syntax utilizes Python SQLAlchemy which is the same syntax as other expressions.
View examples and expression functions in the Expressions area.
3 - Import Excel
Description
Import specific worksheets from Microsoft Excel files from PlaidCloud Document. Analyze supports the legacy Excel format (XP/2003) as well as the new format (2007/2010/2013). This includes, but is not limited to, the following file types:
- XLS
- XLSX
- XLSB
- XLSM
Examples
No examples yet...
Import Parameters
The file selector in this transform allows you to choose a file stored in a PlaidCloud Document location for import.
You can also choose a directory to import and all files within that directory will be imported as part of the transform run.
Source Account
Choose a PlaidCloud Document account for which you have access. This will provide you with the ability to select a directory or file in the next selection.
Search Option
The Search option allows for finding all matching files below a specified directory path to import. This can be particularly useful if many files need to be included but they are stored in nested directories or are mixed in with other files within the same directory which you do not want to import.
The search path selected is the starting directory to search under. The search process will look for all files within that directory as well as sub-directories that match the search conditions specified. Ensure the search criteria can be applied to the files within the sub-directories too.
The search can be applied using the following conditions:
- Exact: Match the search text exactly
- Starts With: Match any file that starts with the search text
- Contains: Match any file that contains the search text
- Ends With: Match any file that ends with the search text
Source FilePath
When a specific file or directory of files are required for import, picking the file or directory is a better option than using search.
To select the file or directory, simply use the browse button to pick the path for the Document account selected above.
Variable Substition
For both the search option and specific file/directory option, variables can be used with in the path, search text, and file names.
An example that uses the current_month variable to dynamically point to the correct file:
legal_entity/inputs/{current_month}/ledger_values.csv
Target Table
The target selection for imports is limited to tables only since views do not contain underlying data.
Dynamic Option
The Dynamic option allows specification of a table using text, including variables. This is useful when employing variable driven workflows where table and view references are relative to the variables specified.
An example that uses the current_month variable to dynamically point to target table:
legal_entity/inputs/{current_month}/ledger_values
Static Option
When a specific table is desired as the target for the import, leave the Dynamic box unchecked and select the target Table.
If the target Table does not exist, select the Create new table button to create the table in the desired location.
Table Explorer is always avaible with any table selection. Click on the Table Explorer button to the right of the table selection and a Table Explorer window will open.
Remove non-ASCII Characters Option
By selecting this option, the import will remove any content that is not ASCII. While PlaidCloud fully supports Unicode (UTF-8), real-world files can contain all sorts of encodings and stray characters that make them challenging to process.
If the content of the file is expected to be ASCII only, checking this box will help ensure the import process runs smoothly.
Delete Files After Import Option
This option will allow the import process to delete the file from the PlaidCloud Document account after a successful import has completed.
This can be useful if the import files are generated can be recreated from a system of record or there is no reason to retain the raw input files once they have been processed.
Header
Since Excel files may or may not contain headers, PlaidCloud provides a way to either use the headers, ignore headers, or use column order to determine the column alignment.
- No Header: The file contains no header. Use the source list in the Data Mapper to determine the column alignment
- Has Header - Use Header and Override Field List: The file has a header. Use the header names specified and ignore the source list in the Data Mapper.
- Has Header - Skip Header and Use Field List Instead: The file has a header but it should be ignored. Use the header names specified by the source list in the Data Mapper.
Row Selection
For input files with extraneous records, you can specify a number of rows to skip before processing the data. This is useful if files contain header blocks that must be skipped before arriving at the tabular data.
Worksheets to Import
Because workbooks may contain many worksheets with different data, it is possible to select which worksheets should be imported in the current import process. The options are:
- All Worksheets
- Worksheets Matching Search
- Selected Worksheets
Using Worksheet Search
The search functionality for worksheets allows inclusion of worksheets matching the search criteria. The search criteria allows for:
- Starts With: The worksheet name starts with the search text
- Contains: The worksheet name contains the search text
- Ends With: The worksheet name ends with the search text
Find Sheets in Selected File
The find sheets button will open the Excel file and list the worksheets available in the table. Mark the checkboxes in the table for the worksheets to be included in the import.
Table Data Selection
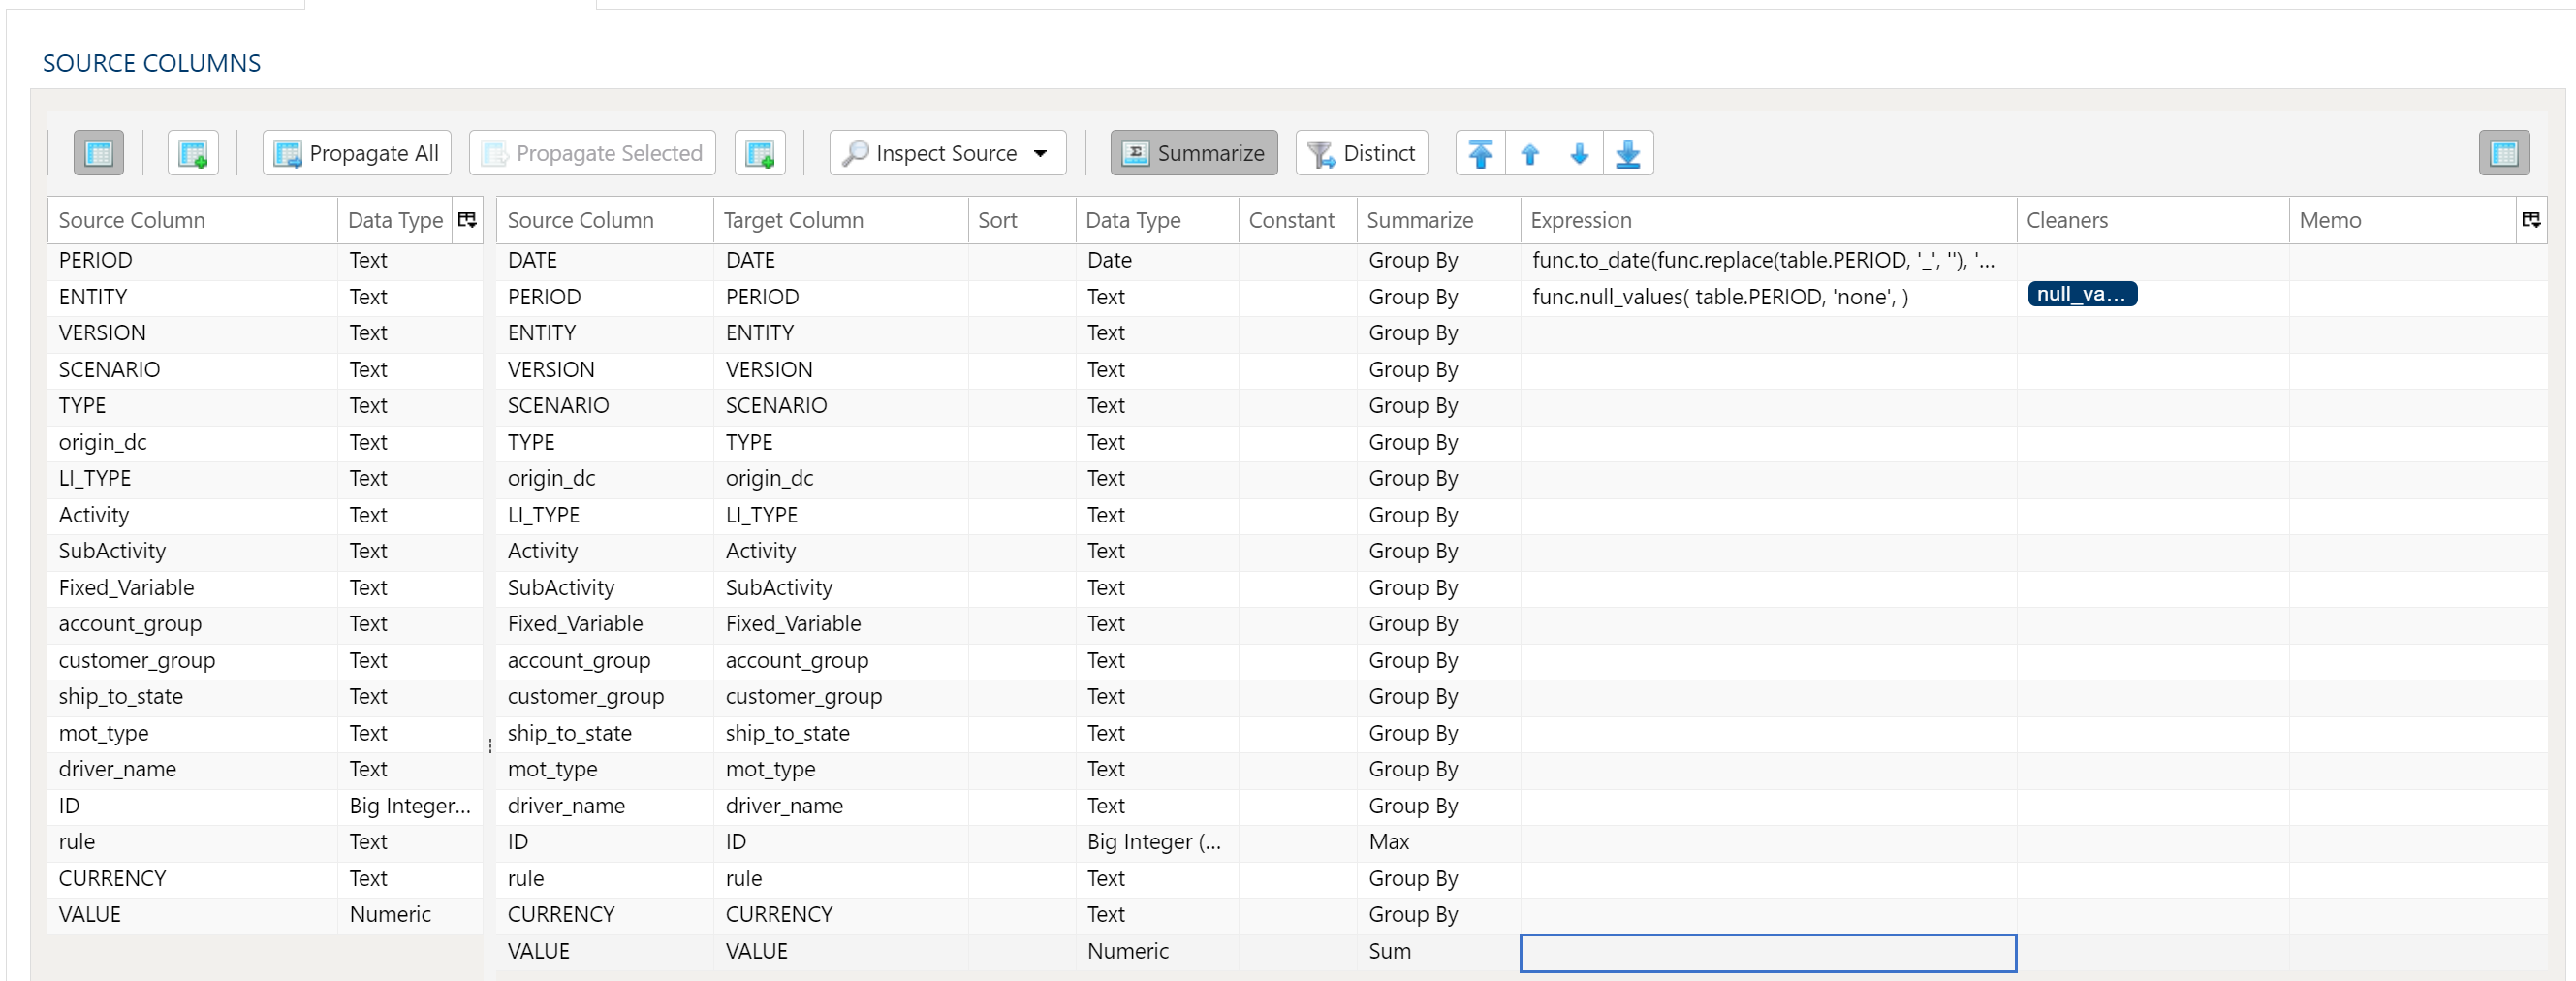
Data Mapper Configuration
The Data Mapper is used to map columns from the source data to the target data table.
Inspection and Populating the Mapper
Using the Inspect Source menu button provides additional ways to map columns from source to target:
- Populate Both Mapping Tables: Propagates all values from the source data table into the target data table. This is done by default.
- Populate Source Mapping Table Only: Maps all values in the source data table only. This is helpful when modifying an existing workflow when source column structure has changed.
- Populate Target Mapping Table Only: Propagates all values into the target data table only.
If the source and target column options aren’t enough, other columns can be added into the target data table in several different ways:
- Propagate All will insert all source columns into the target data table, whether they already existed or not.
- Propagate Selected will insert selected source column(s) only.
- Right click on target side and select Insert Row to insert a row immediately above the currently selected row.
- Right click on target side and select Append Row to insert a row at the bottom (far right) of the target data table.
Deleting Columns
To delete columns from the target data table, select the desired column(s), then right click and select Delete.
Changing Column Order
To rearrange columns in the target data table, select the desired column(s). You can use either:
- Bulk Move Arrows: Select the desired move option from the arrows in the upper right
- Context Menu: Right clikc and select Move to Top, Move Up, Move Down, or Move to Bottom.
Reduce Result to Distinct Records Only
To return only distinct options, select the Distinct menu option. This will toggle a set of checkboxes for each column in the source. Simply check any box next to the corresponding column to return only distinct results.
Depending on the situation, you may want to consider use of Summarization instead.
The distinct process retains the first unique record found and discards the rest. You may want to apply a sort on the data if it is important for consistency between runs.
Aggregation and Grouping
To aggregate results, select the Summarize menu option. This will toggle a set of select boxes for each column in the target data table. Choose an appropriate summarization method for each column.
- Group By
- Sum
- Min
- Max
- First
- Last
- Count
- Count (including nulls)
- Mean
- Standard Deviation
- Sample Standard Deviation
- Population Standard Deviation
- Variance
- Sample Variance
- Population Variance
- Advanced Non-Group_By
For advanced data mapper usage such as expressions, cleaning, and constants, please see the Advanced Data Mapper Usage
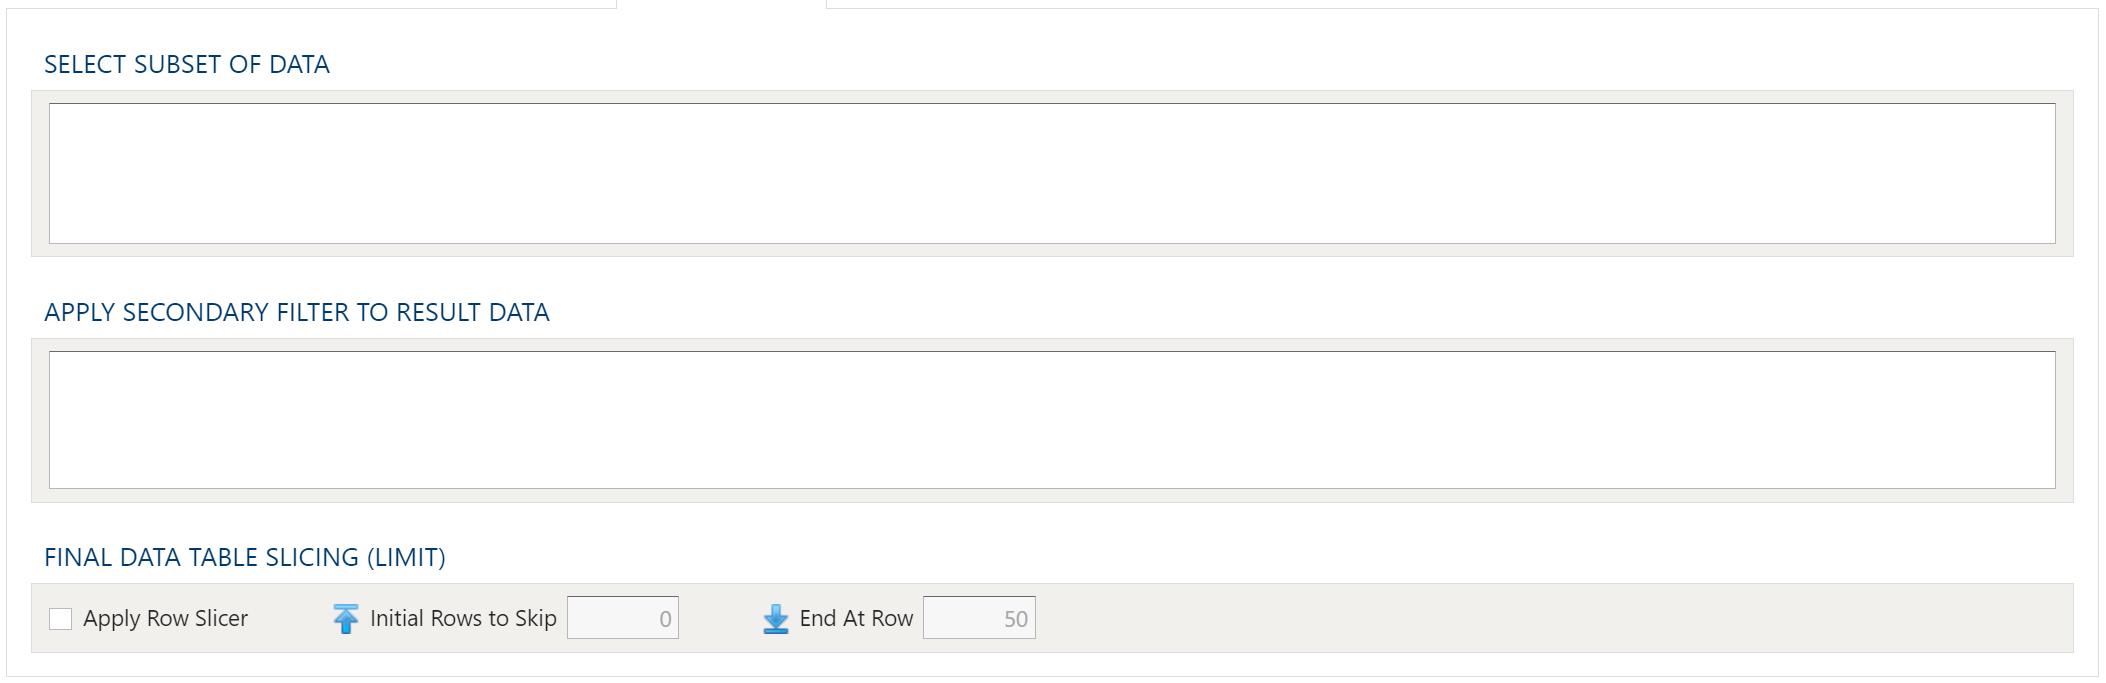
Data Filters
To allow for maximum flexibility, data filters are available on the source data and the target data. For larger data sets, it can be especially beneficial to filter out rows on the source so the remaining operations are performed on a smaller data set.
Select Subset Of Data
This filter type provides a way to filter the inbound source data based on the specified conditions.
Apply Secondary Filter To Result Data
This filter type provides a way to apply a filter to the post-transformed result data based on the specified conditions. The ability to apply a filter on the post-transformed result allows for exclusions based on results of complex calcuations, summarizaitons, or window functions.
Final Data Table Slicing (Limit)
The row slicing capability provides the ability to limit the rows in the result set based on a range and starting point.
Filter Syntax
The filter syntax utilizes Python SQLAlchemy which is the same syntax as other expressions.
View examples and expression functions in the Expressions area.
4 - Import External Database Tables
Description
Includes ability to perform delta loads and map to alternate target table names.
Examples
No examples yet...
Unique Configuration Items
None
Common Configuration Items
Remove non-ASCII Characters Option
By selecting this option, the import will remove any content that is not ASCII. While PlaidCloud fully supports Unicode (UTF-8), real-world files can contain all sorts of encodings and stray characters that make them challenging to process.
If the content of the file is expected to be ASCII only, checking this box will help ensure the import process runs smoothly.
Delete Files After Import Option
This option will allow the import process to delete the file from the PlaidCloud Document account after a successful import has completed.
This can be useful if the import files are generated can be recreated from a system of record or there is no reason to retain the raw input files once they have been processed.
Import File Selector
The file selector in this transform allows you to choose a file stored in a PlaidCloud Document location for import.
You can also choose a directory to import and all files within that directory will be imported as part of the transform run.
Selecting a Document Account
Choose a PlaidCloud Document account for which you have access. This will provide you with the ability to select a directory or file in the next selection.
Search Option
The Search option allows for finding all matching files below a specified directory path to import. This can be particularly useful if many files need to be included but they are stored in nested directories or are mixed in with other files within the same directory which you do not want to import.
The search path selected is the starting directory to search under. The search process will look for all files within that directory as well as sub-directories that match the search conditions specified. Ensure the search criteria can be applied to the files within the sub-directories too.
The search can be applied using the following conditions:
- Exact: Match the search text exactly
- Starts With: Match any file that starts with the search text
- Contains: Match any file that contains the search text
- Ends With: Match any file that ends with the search text
File or Directory Selection Option
When a specific file or directory of files are required for import, picking the file or directory is a better option than using search.
To select the file or directory, simply use the browse button to pick the path for the Document account selected above.
Variable Substition
For both the search option and specific file/directory option, variables can be used with in the path, search text, and file names.
An example that uses the current_month variable to dynamically point to the correct file:
legal_entity/inputs/{current_month}/ledger_values.csv
Target Table
The target selection for imports is limited to tables only since views do not contain underlying data.
Dynamic Option
The Dynamic option allows specification of a table using text, including variables. This is useful when employing variable driven workflows where table and view references are relative to the variables specified.
An example that uses the current_month variable to dynamically point to target table:
legal_entity/inputs/{current_month}/ledger_values
Static Option
When a specific table is desired as the target for the import, leave the Dynamic box unchecked and select the target Table.
If the target Table does not exist, select the Create new table button to create the table in the desired location.
Table Explorer is always avaible with any table selection. Click on the Table Explorer button to the right of the table selection and a Table Explorer window will open.
Data Mapper Configuration
The Data Mapper is used to map columns from the source data to the target data table.
Inspection and Populating the Mapper
Using the Inspect Source menu button provides additional ways to map columns from source to target:
- Populate Both Mapping Tables: Propagates all values from the source data table into the target data table. This is done by default.
- Populate Source Mapping Table Only: Maps all values in the source data table only. This is helpful when modifying an existing workflow when source column structure has changed.
- Populate Target Mapping Table Only: Propagates all values into the target data table only.
If the source and target column options aren’t enough, other columns can be added into the target data table in several different ways:
- Propagate All will insert all source columns into the target data table, whether they already existed or not.
- Propagate Selected will insert selected source column(s) only.
- Right click on target side and select Insert Row to insert a row immediately above the currently selected row.
- Right click on target side and select Append Row to insert a row at the bottom (far right) of the target data table.
Deleting Columns
To delete columns from the target data table, select the desired column(s), then right click and select Delete.
Changing Column Order
To rearrange columns in the target data table, select the desired column(s). You can use either:
- Bulk Move Arrows: Select the desired move option from the arrows in the upper right
- Context Menu: Right clikc and select Move to Top, Move Up, Move Down, or Move to Bottom.
Reduce Result to Distinct Records Only
To return only distinct options, select the Distinct menu option. This will toggle a set of checkboxes for each column in the source. Simply check any box next to the corresponding column to return only distinct results.
Depending on the situation, you may want to consider use of Summarization instead.
The distinct process retains the first unique record found and discards the rest. You may want to apply a sort on the data if it is important for consistency between runs.
Aggregation and Grouping
To aggregate results, select the Summarize menu option. This will toggle a set of select boxes for each column in the target data table. Choose an appropriate summarization method for each column.
- Group By
- Sum
- Min
- Max
- First
- Last
- Count
- Count (including nulls)
- Mean
- Standard Deviation
- Sample Standard Deviation
- Population Standard Deviation
- Variance
- Sample Variance
- Population Variance
- Advanced Non-Group_By
For advanced data mapper usage such as expressions, cleaning, and constants, please see the Advanced Data Mapper Usage
To allow for maximum flexibility, data filters are available on the source data and the target data. For larger data sets, it can be especially beneficial to filter out rows on the source so the remaining operations are performed on a smaller data set.
Select Subset Of Data
This filter type provides a way to filter the inbound source data based on the specified conditions.
Apply Secondary Filter To Result Data
This filter type provides a way to apply a filter to the post-transformed result data based on the specified conditions. The ability to apply a filter on the post-transformed result allows for exclusions based on results of complex calcuations, summarizaitons, or window functions.
Final Data Table Slicing (Limit)
The row slicing capability provides the ability to limit the rows in the result set based on a range and starting point.
Filter Syntax
The filter syntax utilizes Python SQLAlchemy which is the same syntax as other expressions.
View examples and expression functions in the Expressions area.
5 - Import Fixed Width
Description
Imports fixed-width files.
Examples
No examples yet…
Import Parameters
The file selector in this transform allows you to choose a file stored in a PlaidCloud Document location for import.
You can also choose a directory to import and all files within that directory will be imported as part of the transform run.
Source Account
Choose a PlaidCloud Document account for which you have access. This will provide you with the ability to select a directory or file in the next selection.
Search Option
The Search option allows for finding all matching files below a specified directory path to import. This can be particularly useful if many files need to be included but they are stored in nested directories or are mixed in with other files within the same directory which you do not want to import.
The search path selected is the starting directory to search under. The search process will look for all files within that directory as well as sub-directories that match the search conditions specified. Ensure the search criteria can be applied to the files within the sub-directories too.
The search can be applied using the following conditions:
- Exact: Match the search text exactly
- Starts With: Match any file that starts with the search text
- Contains: Match any file that contains the search text
- Ends With: Match any file that ends with the search text
Source FilePath
When a specific file or directory of files are required for import, picking the file or directory is a better option than using search.
To select the file or directory, simply use the browse button to pick the path for the Document account selected above.
Variable Substition
For both the search option and specific file/directory option, variables can be used with in the path, search text, and file names.
An example that uses the current_month variable to dynamically point to the correct file:
legal_entity/inputs/{current_month}/ledger_values.csv
Target Table
The target selection for imports is limited to tables only since views do not contain underlying data.
Dynamic Option
The Dynamic option allows specification of a table using text, including variables. This is useful when employing variable driven workflows where table and view references are relative to the variables specified.
An example that uses the current_month variable to dynamically point to target table:
legal_entity/inputs/{current_month}/ledger_values
Static Option
When a specific table is desired as the target for the import, leave the Dynamic box unchecked and select the target Table.
If the target Table does not exist, select the Create new table button to create the table in the desired location.
Table Explorer is always avaible with any table selection. Click on the Table Explorer button to the right of the table selection and a Table Explorer window will open.
Remove non-ASCII Characters Option
By selecting this option, the import will remove any content that is not ASCII. While PlaidCloud fully supports Unicode (UTF-8), real-world files can contain all sorts of encodings and stray characters that make them challenging to process.
If the content of the file is expected to be ASCII only, checking this box will help ensure the import process runs smoothly.
Delete Files After Import Option
This option will allow the import process to delete the file from the PlaidCloud Document account after a successful import has completed.
This can be useful if the import files are generated can be recreated from a system of record or there is no reason to retain the raw input files once they have been processed.
Header
Since Excel files may or may not contain headers, PlaidCloud provides a way to either use the headers, ignore headers, or use column order to determine the column alignment.
- No Header: The file contains no header. Use the source list in the Data Mapper to determine the column alignment
- Has Header - Use Header and Override Field List: The file has a header. Use the header names specified and ignore the source list in the Data Mapper.
- Has Header - Skip Header and Use Field List Instead: The file has a header but it should be ignored. Use the header names specified by the source list in the Data Mapper.
Row Selection
For input files with extraneous records, you can specify a number of rows to skip before processing the data. This is useful if files contain header blocks that must be skipped before arriving at the tabular data.
Column Widths
Enter the widths of the columns seperated with commas or spaces.
Table Data Selection
Data Mapper Configuration
The Data Mapper is used to map columns from the source data to the target data table.
Inspection and Populating the Mapper
Using the Inspect Source menu button provides additional ways to map columns from source to target:
- Populate Both Mapping Tables: Propagates all values from the source data table into the target data table. This is done by default.
- Populate Source Mapping Table Only: Maps all values in the source data table only. This is helpful when modifying an existing workflow when source column structure has changed.
- Populate Target Mapping Table Only: Propagates all values into the target data table only.
If the source and target column options aren’t enough, other columns can be added into the target data table in several different ways:
- Propagate All will insert all source columns into the target data table, whether they already existed or not.
- Propagate Selected will insert selected source column(s) only.
- Right click on target side and select Insert Row to insert a row immediately above the currently selected row.
- Right click on target side and select Append Row to insert a row at the bottom (far right) of the target data table.
Deleting Columns
To delete columns from the target data table, select the desired column(s), then right click and select Delete.
Changing Column Order
To rearrange columns in the target data table, select the desired column(s). You can use either:
- Bulk Move Arrows: Select the desired move option from the arrows in the upper right
- Context Menu: Right clikc and select Move to Top, Move Up, Move Down, or Move to Bottom.
Reduce Result to Distinct Records Only
To return only distinct options, select the Distinct menu option. This will toggle a set of checkboxes for each column in the source. Simply check any box next to the corresponding column to return only distinct results.
Depending on the situation, you may want to consider use of Summarization instead.
The distinct process retains the first unique record found and discards the rest. You may want to apply a sort on the data if it is important for consistency between runs.
Aggregation and Grouping
To aggregate results, select the Summarize menu option. This will toggle a set of select boxes for each column in the target data table. Choose an appropriate summarization method for each column.
- Group By
- Sum
- Min
- Max
- First
- Last
- Count
- Count (including nulls)
- Mean
- Standard Deviation
- Sample Standard Deviation
- Population Standard Deviation
- Variance
- Sample Variance
- Population Variance
- Advanced Non-Group_By
For advanced data mapper usage such as expressions, cleaning, and constants, please see the Advanced Data Mapper Usage
Data Filters
To allow for maximum flexibility, data filters are available on the source data and the target data. For larger data sets, it can be especially beneficial to filter out rows on the source so the remaining operations are performed on a smaller data set.
Select Subset Of Data
This filter type provides a way to filter the inbound source data based on the specified conditions.
Apply Secondary Filter To Result Data
This filter type provides a way to apply a filter to the post-transformed result data based on the specified conditions. The ability to apply a filter on the post-transformed result allows for exclusions based on results of complex calcuations, summarizaitons, or window functions.
Final Data Table Slicing (Limit)
The row slicing capability provides the ability to limit the rows in the result set based on a range and starting point.
Filter Syntax
The filter syntax utilizes Python SQLAlchemy which is the same syntax as other expressions.
View examples and expression functions in the Expressions area.
6 - Import Google BigQuery
Description
Import Google BigQuery files.
Examples
No examples yet...
Unique Configuration Items
Coming soon...
Common Configuration Items
Remove non-ASCII Characters Option
By selecting this option, the import will remove any content that is not ASCII. While PlaidCloud fully supports Unicode (UTF-8), real-world files can contain all sorts of encodings and stray characters that make them challenging to process.
If the content of the file is expected to be ASCII only, checking this box will help ensure the import process runs smoothly.
Delete Files After Import Option
This option will allow the import process to delete the file from the PlaidCloud Document account after a successful import has completed.
This can be useful if the import files are generated can be recreated from a system of record or there is no reason to retain the raw input files once they have been processed.
Import File Selector
The file selector in this transform allows you to choose a file stored in a PlaidCloud Document location for import.
You can also choose a directory to import and all files within that directory will be imported as part of the transform run.
Selecting a Document Account
Choose a PlaidCloud Document account for which you have access. This will provide you with the ability to select a directory or file in the next selection.
Search Option
The Search option allows for finding all matching files below a specified directory path to import. This can be particularly useful if many files need to be included but they are stored in nested directories or are mixed in with other files within the same directory which you do not want to import.
The search path selected is the starting directory to search under. The search process will look for all files within that directory as well as sub-directories that match the search conditions specified. Ensure the search criteria can be applied to the files within the sub-directories too.
The search can be applied using the following conditions:
- Exact: Match the search text exactly
- Starts With: Match any file that starts with the search text
- Contains: Match any file that contains the search text
- Ends With: Match any file that ends with the search text
File or Directory Selection Option
When a specific file or directory of files are required for import, picking the file or directory is a better option than using search.
To select the file or directory, simply use the browse button to pick the path for the Document account selected above.
Variable Substition
For both the search option and specific file/directory option, variables can be used with in the path, search text, and file names.
An example that uses the current_month variable to dynamically point to the correct file:
legal_entity/inputs/{current_month}/ledger_values.csv
Target Table
The target selection for imports is limited to tables only since views do not contain underlying data.
Dynamic Option
The Dynamic option allows specification of a table using text, including variables. This is useful when employing variable driven workflows where table and view references are relative to the variables specified.
An example that uses the current_month variable to dynamically point to target table:
legal_entity/inputs/{current_month}/ledger_values
Static Option
When a specific table is desired as the target for the import, leave the Dynamic box unchecked and select the target Table.
If the target Table does not exist, select the Create new table button to create the table in the desired location.
Table Explorer is always avaible with any table selection. Click on the Table Explorer button to the right of the table selection and a Table Explorer window will open.
Data Mapper Configuration
The Data Mapper is used to map columns from the source data to the target data table.
Inspection and Populating the Mapper
Using the Inspect Source menu button provides additional ways to map columns from source to target:
- Populate Both Mapping Tables: Propagates all values from the source data table into the target data table. This is done by default.
- Populate Source Mapping Table Only: Maps all values in the source data table only. This is helpful when modifying an existing workflow when source column structure has changed.
- Populate Target Mapping Table Only: Propagates all values into the target data table only.
If the source and target column options aren’t enough, other columns can be added into the target data table in several different ways:
- Propagate All will insert all source columns into the target data table, whether they already existed or not.
- Propagate Selected will insert selected source column(s) only.
- Right click on target side and select Insert Row to insert a row immediately above the currently selected row.
- Right click on target side and select Append Row to insert a row at the bottom (far right) of the target data table.
Deleting Columns
To delete columns from the target data table, select the desired column(s), then right click and select Delete.
Changing Column Order
To rearrange columns in the target data table, select the desired column(s). You can use either:
- Bulk Move Arrows: Select the desired move option from the arrows in the upper right
- Context Menu: Right clikc and select Move to Top, Move Up, Move Down, or Move to Bottom.
Reduce Result to Distinct Records Only
To return only distinct options, select the Distinct menu option. This will toggle a set of checkboxes for each column in the source. Simply check any box next to the corresponding column to return only distinct results.
Depending on the situation, you may want to consider use of Summarization instead.
The distinct process retains the first unique record found and discards the rest. You may want to apply a sort on the data if it is important for consistency between runs.
Aggregation and Grouping
To aggregate results, select the Summarize menu option. This will toggle a set of select boxes for each column in the target data table. Choose an appropriate summarization method for each column.
- Group By
- Sum
- Min
- Max
- First
- Last
- Count
- Count (including nulls)
- Mean
- Standard Deviation
- Sample Standard Deviation
- Population Standard Deviation
- Variance
- Sample Variance
- Population Variance
- Advanced Non-Group_By
For advanced data mapper usage such as expressions, cleaning, and constants, please see the Advanced Data Mapper Usage
To allow for maximum flexibility, data filters are available on the source data and the target data. For larger data sets, it can be especially beneficial to filter out rows on the source so the remaining operations are performed on a smaller data set.
Select Subset Of Data
This filter type provides a way to filter the inbound source data based on the specified conditions.
Apply Secondary Filter To Result Data
This filter type provides a way to apply a filter to the post-transformed result data based on the specified conditions. The ability to apply a filter on the post-transformed result allows for exclusions based on results of complex calcuations, summarizaitons, or window functions.
Final Data Table Slicing (Limit)
The row slicing capability provides the ability to limit the rows in the result set based on a range and starting point.
Filter Syntax
The filter syntax utilizes Python SQLAlchemy which is the same syntax as other expressions.
View examples and expression functions in the Expressions area.
7 - Import Google Spreadsheet
Description
Import specific worksheets from Google Spreadsheet files.
Examples
No examples yet...
Import Parameters
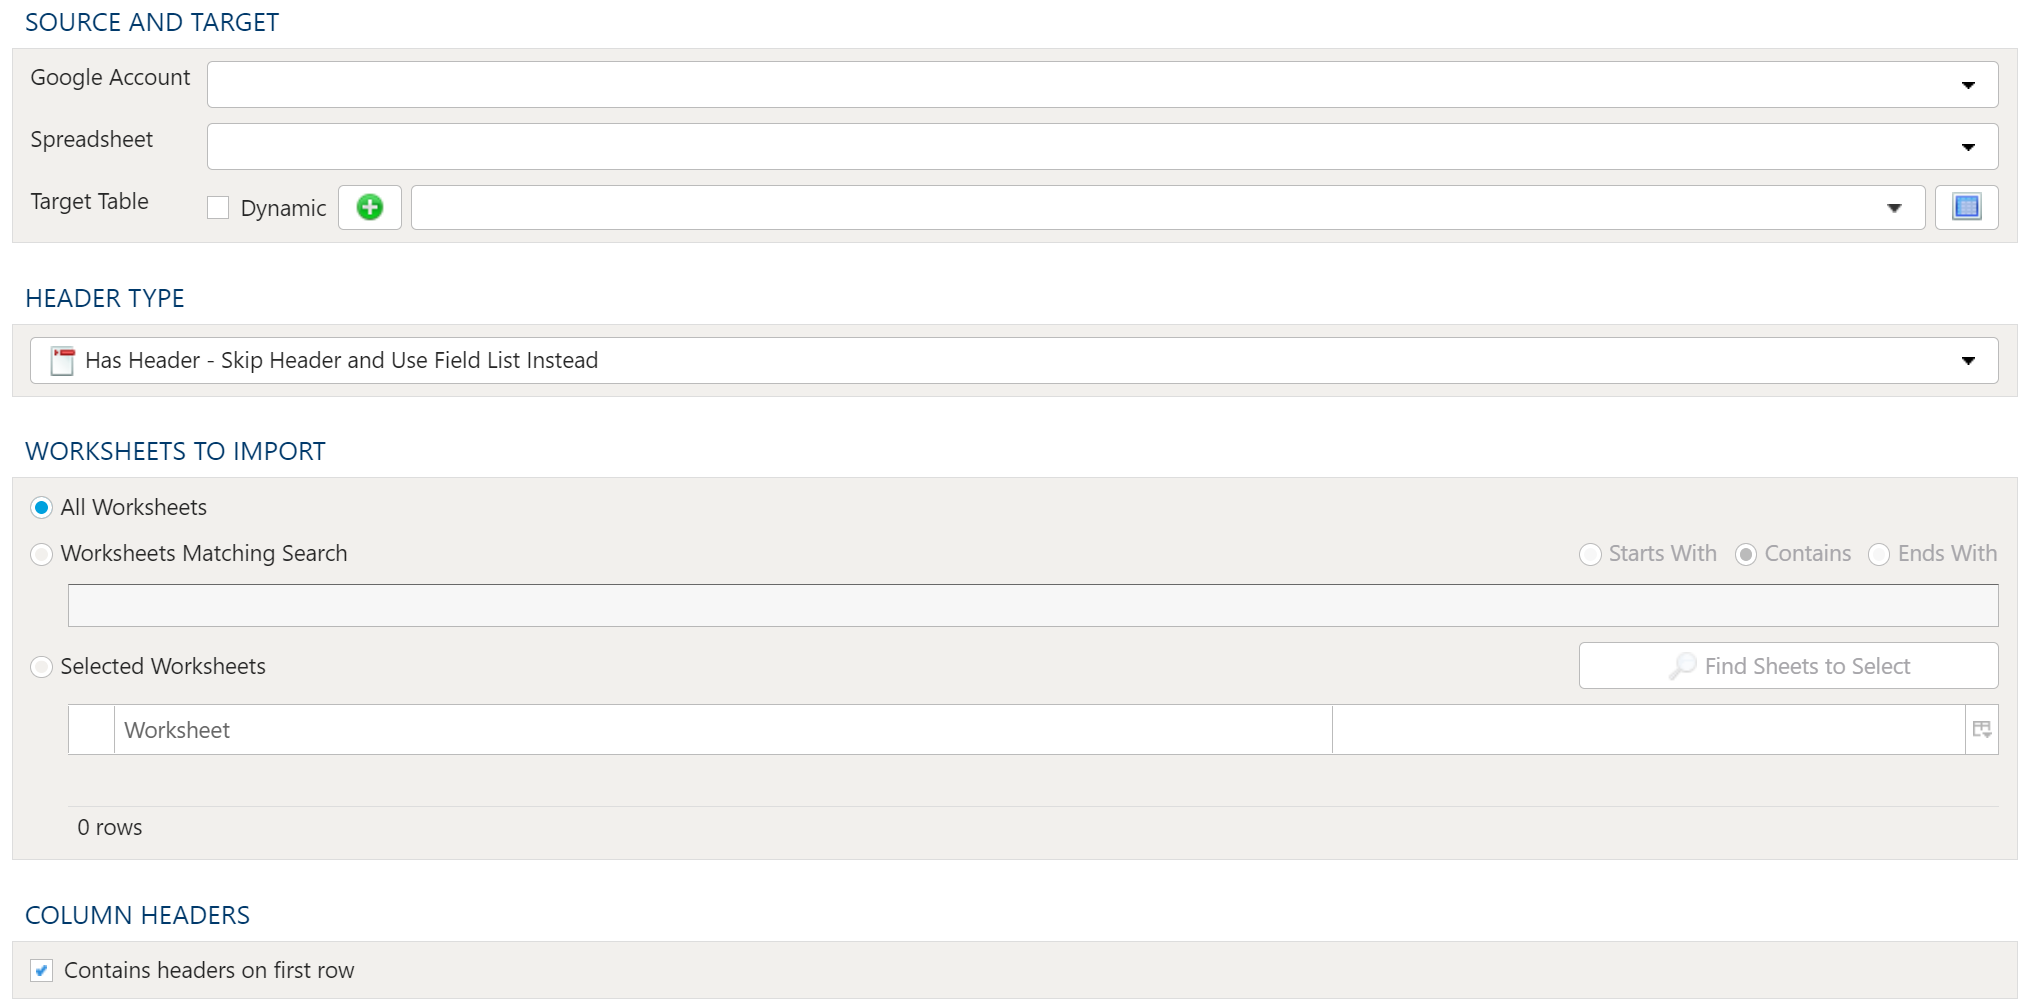
Source And Target
Google Account
Accessing Google Spreadsheet data requires a valid Google user account. This requires set up in Tools. For details on setting up a Google account connection, see here: PlaidCloud Tools – Connection.
Once all necessary accounts have been set up, select the appropriate Google Account from the drop down list.
Spreadsheet
Next, specify the Spreadsheet to import from the dropdown menu containing all available files associated with the specified Google Account.
Target Table
The target selection for imports is limited to tables only since views do not contain underlying data.
Dynamic Option
The Dynamic option allows specification of a table using text, including variables. This is useful when employing variable driven workflows where table and view references are relative to the variables specified.
An example that uses the current_month variable to dynamically point to target table:
legal_entity/inputs/{current_month}/ledger_values
Static Option
When a specific table is desired as the target for the import, leave the Dynamic box unchecked and select the target Table.
If the target Table does not exist, select the Create new table button to create the table in the desired location.
Table Explorer is always avaible with any table selection. Click on the Table Explorer button to the right of the table selection and a Table Explorer window will open.
Header Type
Since Google Spreadsheets may or may not contain headers, PlaidCloud provides a way to either use the headers, ignore headers, or use column order to determine the column alignment.
- No Header: The file contains no header. Use the source list in the Data Mapper to determine the column alignment
- Has Header - Use Header and Override Field List: The file has a header. Use the header names specified and ignore the source list in the Data Mapper.
- Has Header - Skip Header and Use Field List Instead: The file has a header but it should be ignored. Use the header names specified by the source list in the Data Mapper.
Worksheets to Import
Because workbooks may contain many worksheets with different data, it is possible to select which worksheets should be imported in the current import process. The options are:
- All Worksheets
- Worksheets Matching Search
- Selected Worksheets
Using Worksheet Search
The search functionality for worksheets allows inclusion of worksheets matching the search criteria. The search criteria allows for:
- Starts With: The worksheet name starts with the search text
- Contains: The worksheet name contains the search text
- Ends With: The worksheet name ends with the search text
Find Sheets in Selected File
The find sheets button will open the Excel file and list the worksheets available in the table. Mark the checkboxes in the table for the worksheets to be included in the import.
Column Headers
Table Data Selection
Data Mapper Configuration
The Data Mapper is used to map columns from the source data to the target data table.
Inspection and Populating the Mapper
Using the Inspect Source menu button provides additional ways to map columns from source to target:
- Populate Both Mapping Tables: Propagates all values from the source data table into the target data table. This is done by default.
- Populate Source Mapping Table Only: Maps all values in the source data table only. This is helpful when modifying an existing workflow when source column structure has changed.
- Populate Target Mapping Table Only: Propagates all values into the target data table only.
If the source and target column options aren’t enough, other columns can be added into the target data table in several different ways:
- Propagate All will insert all source columns into the target data table, whether they already existed or not.
- Propagate Selected will insert selected source column(s) only.
- Right click on target side and select Insert Row to insert a row immediately above the currently selected row.
- Right click on target side and select Append Row to insert a row at the bottom (far right) of the target data table.
Deleting Columns
To delete columns from the target data table, select the desired column(s), then right click and select Delete.
Changing Column Order
To rearrange columns in the target data table, select the desired column(s). You can use either:
- Bulk Move Arrows: Select the desired move option from the arrows in the upper right
- Context Menu: Right clikc and select Move to Top, Move Up, Move Down, or Move to Bottom.
Reduce Result to Distinct Records Only
To return only distinct options, select the Distinct menu option. This will toggle a set of checkboxes for each column in the source. Simply check any box next to the corresponding column to return only distinct results.
Depending on the situation, you may want to consider use of Summarization instead.
The distinct process retains the first unique record found and discards the rest. You may want to apply a sort on the data if it is important for consistency between runs.
Aggregation and Grouping
To aggregate results, select the Summarize menu option. This will toggle a set of select boxes for each column in the target data table. Choose an appropriate summarization method for each column.
- Group By
- Sum
- Min
- Max
- First
- Last
- Count
- Count (including nulls)
- Mean
- Standard Deviation
- Sample Standard Deviation
- Population Standard Deviation
- Variance
- Sample Variance
- Population Variance
- Advanced Non-Group_By
For advanced data mapper usage such as expressions, cleaning, and constants, please see the Advanced Data Mapper Usage
Data Filters
To allow for maximum flexibility, data filters are available on the source data and the target data. For larger data sets, it can be especially beneficial to filter out rows on the source so the remaining operations are performed on a smaller data set.
Select Subset Of Data
This filter type provides a way to filter the inbound source data based on the specified conditions.
Apply Secondary Filter To Result Data
This filter type provides a way to apply a filter to the post-transformed result data based on the specified conditions. The ability to apply a filter on the post-transformed result allows for exclusions based on results of complex calcuations, summarizaitons, or window functions.
Final Data Table Slicing (Limit)
The row slicing capability provides the ability to limit the rows in the result set based on a range and starting point.
Filter Syntax
The filter syntax utilizes Python SQLAlchemy which is the same syntax as other expressions.
View examples and expression functions in the Expressions area.
8 - Import HDF
Description
Import HDF5 files from PlaidCloud Document.
For more details on HDF5 files, see the HDF Group’s official website here: http://www.hdfgroup.org/HDF5/.
Examples
No examples yet...
Unique Configuration Items
Key Name
HDF files store data in a path structure. A key (path) is needed as the destination for the table within the HDF file. In most situations, this will be table.
Common Configuration Items
Remove non-ASCII Characters Option
By selecting this option, the import will remove any content that is not ASCII. While PlaidCloud fully supports Unicode (UTF-8), real-world files can contain all sorts of encodings and stray characters that make them challenging to process.
If the content of the file is expected to be ASCII only, checking this box will help ensure the import process runs smoothly.
Delete Files After Import Option
This option will allow the import process to delete the file from the PlaidCloud Document account after a successful import has completed.
This can be useful if the import files are generated can be recreated from a system of record or there is no reason to retain the raw input files once they have been processed.
Import File Selector
The file selector in this transform allows you to choose a file stored in a PlaidCloud Document location for import.
You can also choose a directory to import and all files within that directory will be imported as part of the transform run.
Selecting a Document Account
Choose a PlaidCloud Document account for which you have access. This will provide you with the ability to select a directory or file in the next selection.
Search Option
The Search option allows for finding all matching files below a specified directory path to import. This can be particularly useful if many files need to be included but they are stored in nested directories or are mixed in with other files within the same directory which you do not want to import.
The search path selected is the starting directory to search under. The search process will look for all files within that directory as well as sub-directories that match the search conditions specified. Ensure the search criteria can be applied to the files within the sub-directories too.
The search can be applied using the following conditions:
- Exact: Match the search text exactly
- Starts With: Match any file that starts with the search text
- Contains: Match any file that contains the search text
- Ends With: Match any file that ends with the search text
File or Directory Selection Option
When a specific file or directory of files are required for import, picking the file or directory is a better option than using search.
To select the file or directory, simply use the browse button to pick the path for the Document account selected above.
Variable Substition
For both the search option and specific file/directory option, variables can be used with in the path, search text, and file names.
An example that uses the current_month variable to dynamically point to the correct file:
legal_entity/inputs/{current_month}/ledger_values.csv
Target Table
The target selection for imports is limited to tables only since views do not contain underlying data.
Dynamic Option
The Dynamic option allows specification of a table using text, including variables. This is useful when employing variable driven workflows where table and view references are relative to the variables specified.
An example that uses the current_month variable to dynamically point to target table:
legal_entity/inputs/{current_month}/ledger_values
Static Option
When a specific table is desired as the target for the import, leave the Dynamic box unchecked and select the target Table.
If the target Table does not exist, select the Create new table button to create the table in the desired location.
Table Explorer is always avaible with any table selection. Click on the Table Explorer button to the right of the table selection and a Table Explorer window will open.
Data Mapper Configuration
The Data Mapper is used to map columns from the source data to the target data table.
Inspection and Populating the Mapper
Using the Inspect Source menu button provides additional ways to map columns from source to target:
- Populate Both Mapping Tables: Propagates all values from the source data table into the target data table. This is done by default.
- Populate Source Mapping Table Only: Maps all values in the source data table only. This is helpful when modifying an existing workflow when source column structure has changed.
- Populate Target Mapping Table Only: Propagates all values into the target data table only.
If the source and target column options aren’t enough, other columns can be added into the target data table in several different ways:
- Propagate All will insert all source columns into the target data table, whether they already existed or not.
- Propagate Selected will insert selected source column(s) only.
- Right click on target side and select Insert Row to insert a row immediately above the currently selected row.
- Right click on target side and select Append Row to insert a row at the bottom (far right) of the target data table.
Deleting Columns
To delete columns from the target data table, select the desired column(s), then right click and select Delete.
Changing Column Order
To rearrange columns in the target data table, select the desired column(s). You can use either:
- Bulk Move Arrows: Select the desired move option from the arrows in the upper right
- Context Menu: Right clikc and select Move to Top, Move Up, Move Down, or Move to Bottom.
Reduce Result to Distinct Records Only
To return only distinct options, select the Distinct menu option. This will toggle a set of checkboxes for each column in the source. Simply check any box next to the corresponding column to return only distinct results.
Depending on the situation, you may want to consider use of Summarization instead.
The distinct process retains the first unique record found and discards the rest. You may want to apply a sort on the data if it is important for consistency between runs.
Aggregation and Grouping
To aggregate results, select the Summarize menu option. This will toggle a set of select boxes for each column in the target data table. Choose an appropriate summarization method for each column.
- Group By
- Sum
- Min
- Max
- First
- Last
- Count
- Count (including nulls)
- Mean
- Standard Deviation
- Sample Standard Deviation
- Population Standard Deviation
- Variance
- Sample Variance
- Population Variance
- Advanced Non-Group_By
For advanced data mapper usage such as expressions, cleaning, and constants, please see the Advanced Data Mapper Usage
To allow for maximum flexibility, data filters are available on the source data and the target data. For larger data sets, it can be especially beneficial to filter out rows on the source so the remaining operations are performed on a smaller data set.
Select Subset Of Data
This filter type provides a way to filter the inbound source data based on the specified conditions.
Apply Secondary Filter To Result Data
This filter type provides a way to apply a filter to the post-transformed result data based on the specified conditions. The ability to apply a filter on the post-transformed result allows for exclusions based on results of complex calcuations, summarizaitons, or window functions.
Final Data Table Slicing (Limit)
The row slicing capability provides the ability to limit the rows in the result set based on a range and starting point.
Filter Syntax
The filter syntax utilizes Python SQLAlchemy which is the same syntax as other expressions.
View examples and expression functions in the Expressions area.
9 - Import HTML
Description
Import HTML table data from the internet.
Examples
No examples yet...
Unique Configuration Items
Select Tables in HTML
Since it is possible to have multiple tables on a web page, the user must specify which table to import. To do so, specify Name and/or Attribute values to match.
For example, consider the following table:
<table border="1" id="import"> <tr> <th>Hello</th><th>World</th> </tr> <tr> <td>1</td><td>2</td> </tr> <tr> <td>3</td><td>4</td> </tr> </table>
To import this table, specify id:import in the Name Match field.
Additionally, there is an option to skip rows at the beginning of the table.
Column Headers
Specify the row to use for header information. By default, the Column Header Row is 0.
Common Configuration Items
Remove non-ASCII Characters Option
By selecting this option, the import will remove any content that is not ASCII. While PlaidCloud fully supports Unicode (UTF-8), real-world files can contain all sorts of encodings and stray characters that make them challenging to process.
If the content of the file is expected to be ASCII only, checking this box will help ensure the import process runs smoothly.
Delete Files After Import Option
This option will allow the import process to delete the file from the PlaidCloud Document account after a successful import has completed.
This can be useful if the import files are generated can be recreated from a system of record or there is no reason to retain the raw input files once they have been processed.
Import File Selector
The file selector in this transform allows you to choose a file stored in a PlaidCloud Document location for import.
You can also choose a directory to import and all files within that directory will be imported as part of the transform run.
Selecting a Document Account
Choose a PlaidCloud Document account for which you have access. This will provide you with the ability to select a directory or file in the next selection.
Search Option
The Search option allows for finding all matching files below a specified directory path to import. This can be particularly useful if many files need to be included but they are stored in nested directories or are mixed in with other files within the same directory which you do not want to import.
The search path selected is the starting directory to search under. The search process will look for all files within that directory as well as sub-directories that match the search conditions specified. Ensure the search criteria can be applied to the files within the sub-directories too.
The search can be applied using the following conditions:
- Exact: Match the search text exactly
- Starts With: Match any file that starts with the search text
- Contains: Match any file that contains the search text
- Ends With: Match any file that ends with the search text
File or Directory Selection Option
When a specific file or directory of files are required for import, picking the file or directory is a better option than using search.
To select the file or directory, simply use the browse button to pick the path for the Document account selected above.
Variable Substition
For both the search option and specific file/directory option, variables can be used with in the path, search text, and file names.
An example that uses the current_month variable to dynamically point to the correct file:
legal_entity/inputs/{current_month}/ledger_values.csv
Target Table
The target selection for imports is limited to tables only since views do not contain underlying data.
Dynamic Option
The Dynamic option allows specification of a table using text, including variables. This is useful when employing variable driven workflows where table and view references are relative to the variables specified.
An example that uses the current_month variable to dynamically point to target table:
legal_entity/inputs/{current_month}/ledger_values
Static Option
When a specific table is desired as the target for the import, leave the Dynamic box unchecked and select the target Table.
If the target Table does not exist, select the Create new table button to create the table in the desired location.
Table Explorer is always avaible with any table selection. Click on the Table Explorer button to the right of the table selection and a Table Explorer window will open.
Data Mapper Configuration
The Data Mapper is used to map columns from the source data to the target data table.
Inspection and Populating the Mapper
Using the Inspect Source menu button provides additional ways to map columns from source to target:
- Populate Both Mapping Tables: Propagates all values from the source data table into the target data table. This is done by default.
- Populate Source Mapping Table Only: Maps all values in the source data table only. This is helpful when modifying an existing workflow when source column structure has changed.
- Populate Target Mapping Table Only: Propagates all values into the target data table only.
If the source and target column options aren’t enough, other columns can be added into the target data table in several different ways:
- Propagate All will insert all source columns into the target data table, whether they already existed or not.
- Propagate Selected will insert selected source column(s) only.
- Right click on target side and select Insert Row to insert a row immediately above the currently selected row.
- Right click on target side and select Append Row to insert a row at the bottom (far right) of the target data table.
Deleting Columns
To delete columns from the target data table, select the desired column(s), then right click and select Delete.
Changing Column Order
To rearrange columns in the target data table, select the desired column(s). You can use either:
- Bulk Move Arrows: Select the desired move option from the arrows in the upper right
- Context Menu: Right clikc and select Move to Top, Move Up, Move Down, or Move to Bottom.
Reduce Result to Distinct Records Only
To return only distinct options, select the Distinct menu option. This will toggle a set of checkboxes for each column in the source. Simply check any box next to the corresponding column to return only distinct results.
Depending on the situation, you may want to consider use of Summarization instead.
The distinct process retains the first unique record found and discards the rest. You may want to apply a sort on the data if it is important for consistency between runs.
Aggregation and Grouping
To aggregate results, select the Summarize menu option. This will toggle a set of select boxes for each column in the target data table. Choose an appropriate summarization method for each column.
- Group By
- Sum
- Min
- Max
- First
- Last
- Count
- Count (including nulls)
- Mean
- Standard Deviation
- Sample Standard Deviation
- Population Standard Deviation
- Variance
- Sample Variance
- Population Variance
- Advanced Non-Group_By
For advanced data mapper usage such as expressions, cleaning, and constants, please see the Advanced Data Mapper Usage
To allow for maximum flexibility, data filters are available on the source data and the target data. For larger data sets, it can be especially beneficial to filter out rows on the source so the remaining operations are performed on a smaller data set.
Select Subset Of Data
This filter type provides a way to filter the inbound source data based on the specified conditions.
Apply Secondary Filter To Result Data
This filter type provides a way to apply a filter to the post-transformed result data based on the specified conditions. The ability to apply a filter on the post-transformed result allows for exclusions based on results of complex calcuations, summarizaitons, or window functions.
Final Data Table Slicing (Limit)
The row slicing capability provides the ability to limit the rows in the result set based on a range and starting point.
Filter Syntax
The filter syntax utilizes Python SQLAlchemy which is the same syntax as other expressions.
View examples and expression functions in the Expressions area.
10 - Import JSON
Description
Import JSON text files from PlaidCloud Document.
For more details on JSON files, see the JSON official website here: http://json.org/.
JSON files do not retain column order. The column order in the source file does not necessarily reflect the column order in the imported data table.
Examples
No examples yet...
Unique Configuration Items
JSON Data Orientation
Consider the following data set:
| ID | Name | Gender | State | | 1 | Jack | M | MO | | 2 | Jill | F | MO | | 3 | George | M | VA | | 4 | Abe | M | KY |
JSON files can be imported from one of three data formats:
- Records: Data is stored in Python dictionary sets, with each row stored in {Column -> Value, …} format. For example:
[{ "ID": 1, "Name": "Jack", "Gender": "M", "State": "MO" }, { "ID": 2, "Name": "Jill", "Gender": "F", "State": "MO" }, { "ID": 3, "Name": "George", "Gender": "M", "State": "VA" }, { "ID": 4, "Name": "Abe", "Gender": "M", "State": "KY" }]
- Index: Data is stored in nested Python dictionary sets, with each row stored in {Index -> {Column -> Value, …},…} format. For example:
{ "0": { "ID": 1, "Name": "Jack", "Gender": "M", "State": "MO" }, "1": { "ID": 2, "Name": "Jill", "Gender": "F", "State": "MO" }, "2": { "ID": 3, "Name": "George", "Gender": "M", "State": "VA" }, "3": { "ID": 4, "Name": "Abe", "Gender": "M", "State": "KY" } }
- Split: Data is stored in a single Python dictionary set, values stored in lists. For example:
{ "columns": ["ID", "Name", "Gender", "State"], "index": [0, 1, 2, 3], "data": [ [1, "Jack", "M", "MO"], [2, "Jill", "F", "MO"], [3, "George", "M", "VA"], [4, "Abe", "M", "KY"] ] }
Common Configuration Items
Remove non-ASCII Characters Option
By selecting this option, the import will remove any content that is not ASCII. While PlaidCloud fully supports Unicode (UTF-8), real-world files can contain all sorts of encodings and stray characters that make them challenging to process.
If the content of the file is expected to be ASCII only, checking this box will help ensure the import process runs smoothly.
Delete Files After Import Option
This option will allow the import process to delete the file from the PlaidCloud Document account after a successful import has completed.
This can be useful if the import files are generated can be recreated from a system of record or there is no reason to retain the raw input files once they have been processed.
Import File Selector
The file selector in this transform allows you to choose a file stored in a PlaidCloud Document location for import.
You can also choose a directory to import and all files within that directory will be imported as part of the transform run.
Selecting a Document Account
Choose a PlaidCloud Document account for which you have access. This will provide you with the ability to select a directory or file in the next selection.
Search Option
The Search option allows for finding all matching files below a specified directory path to import. This can be particularly useful if many files need to be included but they are stored in nested directories or are mixed in with other files within the same directory which you do not want to import.
The search path selected is the starting directory to search under. The search process will look for all files within that directory as well as sub-directories that match the search conditions specified. Ensure the search criteria can be applied to the files within the sub-directories too.
The search can be applied using the following conditions:
- Exact: Match the search text exactly
- Starts With: Match any file that starts with the search text
- Contains: Match any file that contains the search text
- Ends With: Match any file that ends with the search text
File or Directory Selection Option
When a specific file or directory of files are required for import, picking the file or directory is a better option than using search.
To select the file or directory, simply use the browse button to pick the path for the Document account selected above.
Variable Substition
For both the search option and specific file/directory option, variables can be used with in the path, search text, and file names.
An example that uses the current_month variable to dynamically point to the correct file:
legal_entity/inputs/{current_month}/ledger_values.csv
Target Table
The target selection for imports is limited to tables only since views do not contain underlying data.
Dynamic Option
The Dynamic option allows specification of a table using text, including variables. This is useful when employing variable driven workflows where table and view references are relative to the variables specified.
An example that uses the current_month variable to dynamically point to target table:
legal_entity/inputs/{current_month}/ledger_values
Static Option
When a specific table is desired as the target for the import, leave the Dynamic box unchecked and select the target Table.
If the target Table does not exist, select the Create new table button to create the table in the desired location.
Table Explorer is always avaible with any table selection. Click on the Table Explorer button to the right of the table selection and a Table Explorer window will open.
Data Mapper Configuration
The Data Mapper is used to map columns from the source data to the target data table.
Inspection and Populating the Mapper
Using the Inspect Source menu button provides additional ways to map columns from source to target:
- Populate Both Mapping Tables: Propagates all values from the source data table into the target data table. This is done by default.
- Populate Source Mapping Table Only: Maps all values in the source data table only. This is helpful when modifying an existing workflow when source column structure has changed.
- Populate Target Mapping Table Only: Propagates all values into the target data table only.
If the source and target column options aren’t enough, other columns can be added into the target data table in several different ways:
- Propagate All will insert all source columns into the target data table, whether they already existed or not.
- Propagate Selected will insert selected source column(s) only.
- Right click on target side and select Insert Row to insert a row immediately above the currently selected row.
- Right click on target side and select Append Row to insert a row at the bottom (far right) of the target data table.
Deleting Columns
To delete columns from the target data table, select the desired column(s), then right click and select Delete.
Changing Column Order
To rearrange columns in the target data table, select the desired column(s). You can use either:
- Bulk Move Arrows: Select the desired move option from the arrows in the upper right
- Context Menu: Right clikc and select Move to Top, Move Up, Move Down, or Move to Bottom.
Reduce Result to Distinct Records Only
To return only distinct options, select the Distinct menu option. This will toggle a set of checkboxes for each column in the source. Simply check any box next to the corresponding column to return only distinct results.
Depending on the situation, you may want to consider use of Summarization instead.
The distinct process retains the first unique record found and discards the rest. You may want to apply a sort on the data if it is important for consistency between runs.
Aggregation and Grouping
To aggregate results, select the Summarize menu option. This will toggle a set of select boxes for each column in the target data table. Choose an appropriate summarization method for each column.
- Group By
- Sum
- Min
- Max
- First
- Last
- Count
- Count (including nulls)
- Mean
- Standard Deviation
- Sample Standard Deviation
- Population Standard Deviation
- Variance
- Sample Variance
- Population Variance
- Advanced Non-Group_By
For advanced data mapper usage such as expressions, cleaning, and constants, please see the Advanced Data Mapper Usage
To allow for maximum flexibility, data filters are available on the source data and the target data. For larger data sets, it can be especially beneficial to filter out rows on the source so the remaining operations are performed on a smaller data set.
Select Subset Of Data
This filter type provides a way to filter the inbound source data based on the specified conditions.
Apply Secondary Filter To Result Data
This filter type provides a way to apply a filter to the post-transformed result data based on the specified conditions. The ability to apply a filter on the post-transformed result allows for exclusions based on results of complex calcuations, summarizaitons, or window functions.
Final Data Table Slicing (Limit)
The row slicing capability provides the ability to limit the rows in the result set based on a range and starting point.
Filter Syntax
The filter syntax utilizes Python SQLAlchemy which is the same syntax as other expressions.
View examples and expression functions in the Expressions area.
11 - Import Project Table
Description
Import table data from a different project.
Data Sharing Management

In order to import a table from another project you must first go to both projects Home Tab and allow the projects to share data with each other. To do this select New Data Share and select the project and give them Read access.
Import External Project Table
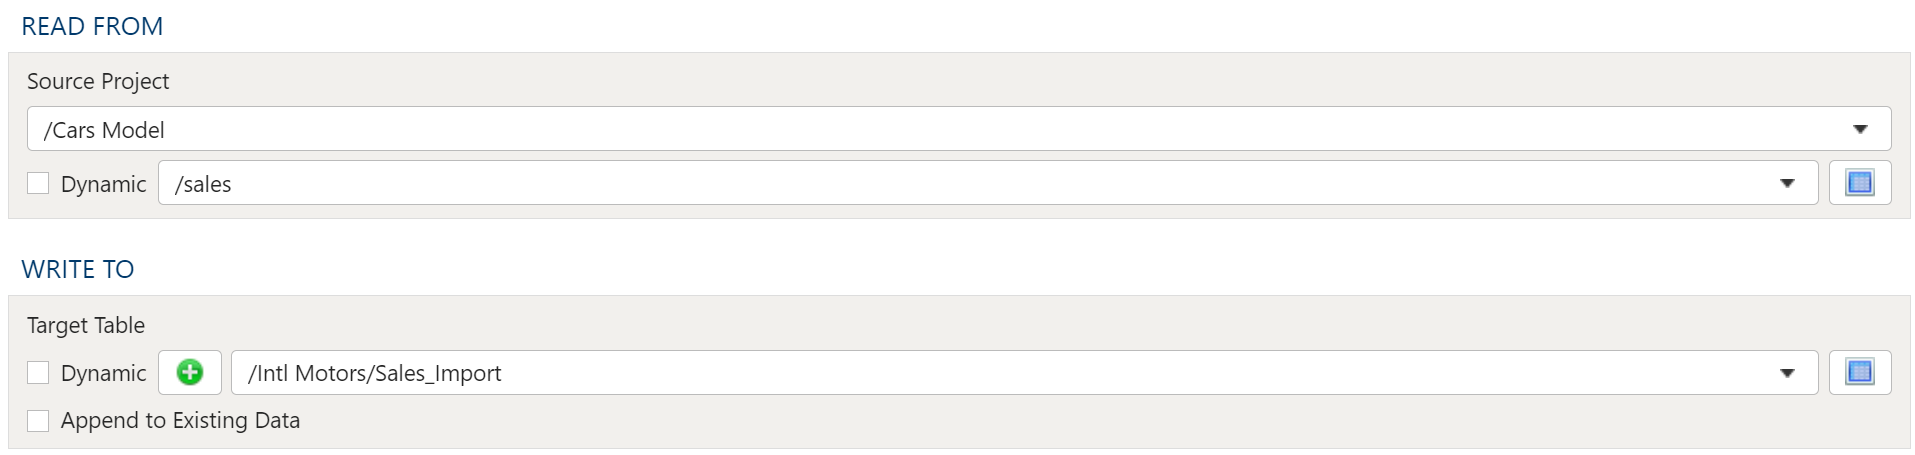
Read From
Select the Source Project and Source Table from the drop downs.
Write To
Target Table
The target selection for imports is limited to tables only since views do not contain underlying data.
Dynamic Option
The Dynamic option allows specification of a table using text, including variables. This is useful when employing variable driven workflows where table and view references are relative to the variables specified.
An example that uses the current_month variable to dynamically point to target table:
legal_entity/inputs/{current_month}/ledger_values
Static Option
When a specific table is desired as the target for the import, leave the Dynamic box unchecked and select the target Table.
If the target Table does not exist, select the Create new table button to create the table in the desired location.
Table Explorer is always avaible with any table selection. Click on the Table Explorer button to the right of the table selection and a Table Explorer window will open.
12 - Import Quandl
Description
Imports data sets from Quandl’s repository of millions of data sets.
For more details on Quandl data sets, see the Quandl official website here: http://www.quandl.com/.
Examples
No examples yet...
Unique Configuration Items
Source Data Specification
Accessing Quandl data sets requires a user account or a guest account with limited access. This requires set up in Tools. For details on setting up a Quandl account connection, see here: PlaidCloud Tools – Connection.
Once all necessary accounts have been set up, select the appropriate account from the drop down list.
Next, enter criteria for the desired Quandl code. Users can use the Search functionality to search for data sets. Alternatively, data sets can be entered manually. This requires the user to enter the portion of the URL after “http://www.quandl.com”.
For example, to import the data set for Microsoft stock, which can be found here (http://www.quandl.com/GOOG/NASDAQ_MSFT), enter GOOG/NASDAQ_MSFT in the Quandl Code field.
Data Selection
It is possible to slice Quandl data sets upon import. Available options include the following:
- Start Date: Use the date picker to select the desired date.
- End Date: Use the date picker to select the desired date.
- Collapse: Aggregate results on a daily, weekly, monthly, quarterly, or annual basis. There is no aggregation by default.
- Transformation: Summary calculations.
- Limit Rows: The default value of 0 returns all rows. Any other positive integer value will specify the limit of rows to return from the data set.
Common Configuration Items
Remove non-ASCII Characters Option
By selecting this option, the import will remove any content that is not ASCII. While PlaidCloud fully supports Unicode (UTF-8), real-world files can contain all sorts of encodings and stray characters that make them challenging to process.
If the content of the file is expected to be ASCII only, checking this box will help ensure the import process runs smoothly.
Delete Files After Import Option
This option will allow the import process to delete the file from the PlaidCloud Document account after a successful import has completed.
This can be useful if the import files are generated can be recreated from a system of record or there is no reason to retain the raw input files once they have been processed.
Target Table
The target selection for imports is limited to tables only since views do not contain underlying data.
Dynamic Option
The Dynamic option allows specification of a table using text, including variables. This is useful when employing variable driven workflows where table and view references are relative to the variables specified.
An example that uses the current_month variable to dynamically point to target table:
legal_entity/inputs/{current_month}/ledger_values
Static Option
When a specific table is desired as the target for the import, leave the Dynamic box unchecked and select the target Table.
If the target Table does not exist, select the Create new table button to create the table in the desired location.
Table Explorer is always avaible with any table selection. Click on the Table Explorer button to the right of the table selection and a Table Explorer window will open.
Data Mapper Configuration
The Data Mapper is used to map columns from the source data to the target data table.
Inspection and Populating the Mapper
Using the Inspect Source menu button provides additional ways to map columns from source to target:
- Populate Both Mapping Tables: Propagates all values from the source data table into the target data table. This is done by default.
- Populate Source Mapping Table Only: Maps all values in the source data table only. This is helpful when modifying an existing workflow when source column structure has changed.
- Populate Target Mapping Table Only: Propagates all values into the target data table only.
If the source and target column options aren’t enough, other columns can be added into the target data table in several different ways:
- Propagate All will insert all source columns into the target data table, whether they already existed or not.
- Propagate Selected will insert selected source column(s) only.
- Right click on target side and select Insert Row to insert a row immediately above the currently selected row.
- Right click on target side and select Append Row to insert a row at the bottom (far right) of the target data table.
Deleting Columns
To delete columns from the target data table, select the desired column(s), then right click and select Delete.
Changing Column Order
To rearrange columns in the target data table, select the desired column(s). You can use either:
- Bulk Move Arrows: Select the desired move option from the arrows in the upper right
- Context Menu: Right clikc and select Move to Top, Move Up, Move Down, or Move to Bottom.
Reduce Result to Distinct Records Only
To return only distinct options, select the Distinct menu option. This will toggle a set of checkboxes for each column in the source. Simply check any box next to the corresponding column to return only distinct results.
Depending on the situation, you may want to consider use of Summarization instead.
The distinct process retains the first unique record found and discards the rest. You may want to apply a sort on the data if it is important for consistency between runs.
Aggregation and Grouping
To aggregate results, select the Summarize menu option. This will toggle a set of select boxes for each column in the target data table. Choose an appropriate summarization method for each column.
- Group By
- Sum
- Min
- Max
- First
- Last
- Count
- Count (including nulls)
- Mean
- Standard Deviation
- Sample Standard Deviation
- Population Standard Deviation
- Variance
- Sample Variance
- Population Variance
- Advanced Non-Group_By
For advanced data mapper usage such as expressions, cleaning, and constants, please see the Advanced Data Mapper Usage
To allow for maximum flexibility, data filters are available on the source data and the target data. For larger data sets, it can be especially beneficial to filter out rows on the source so the remaining operations are performed on a smaller data set.
Select Subset Of Data
This filter type provides a way to filter the inbound source data based on the specified conditions.
Apply Secondary Filter To Result Data
This filter type provides a way to apply a filter to the post-transformed result data based on the specified conditions. The ability to apply a filter on the post-transformed result allows for exclusions based on results of complex calcuations, summarizaitons, or window functions.
Final Data Table Slicing (Limit)
The row slicing capability provides the ability to limit the rows in the result set based on a range and starting point.
Filter Syntax
The filter syntax utilizes Python SQLAlchemy which is the same syntax as other expressions.
View examples and expression functions in the Expressions area.
13 - Import SAS7BDAT
Description
Import SAS table files from PlaidCloud Document.
Examples
No examples yet...
Unique Configuration Items
None
Common Configuration Items
Remove non-ASCII Characters Option
By selecting this option, the import will remove any content that is not ASCII. While PlaidCloud fully supports Unicode (UTF-8), real-world files can contain all sorts of encodings and stray characters that make them challenging to process.
If the content of the file is expected to be ASCII only, checking this box will help ensure the import process runs smoothly.
Delete Files After Import Option
This option will allow the import process to delete the file from the PlaidCloud Document account after a successful import has completed.
This can be useful if the import files are generated can be recreated from a system of record or there is no reason to retain the raw input files once they have been processed.
Import File Selector
The file selector in this transform allows you to choose a file stored in a PlaidCloud Document location for import.
You can also choose a directory to import and all files within that directory will be imported as part of the transform run.
Selecting a Document Account
Choose a PlaidCloud Document account for which you have access. This will provide you with the ability to select a directory or file in the next selection.
Search Option
The Search option allows for finding all matching files below a specified directory path to import. This can be particularly useful if many files need to be included but they are stored in nested directories or are mixed in with other files within the same directory which you do not want to import.
The search path selected is the starting directory to search under. The search process will look for all files within that directory as well as sub-directories that match the search conditions specified. Ensure the search criteria can be applied to the files within the sub-directories too.
The search can be applied using the following conditions:
- Exact: Match the search text exactly
- Starts With: Match any file that starts with the search text
- Contains: Match any file that contains the search text
- Ends With: Match any file that ends with the search text
File or Directory Selection Option
When a specific file or directory of files are required for import, picking the file or directory is a better option than using search.
To select the file or directory, simply use the browse button to pick the path for the Document account selected above.
Variable Substition
For both the search option and specific file/directory option, variables can be used with in the path, search text, and file names.
An example that uses the current_month variable to dynamically point to the correct file:
legal_entity/inputs/{current_month}/ledger_values.csv
Target Table
The target selection for imports is limited to tables only since views do not contain underlying data.
Dynamic Option
The Dynamic option allows specification of a table using text, including variables. This is useful when employing variable driven workflows where table and view references are relative to the variables specified.
An example that uses the current_month variable to dynamically point to target table:
legal_entity/inputs/{current_month}/ledger_values
Static Option
When a specific table is desired as the target for the import, leave the Dynamic box unchecked and select the target Table.
If the target Table does not exist, select the Create new table button to create the table in the desired location.
Table Explorer is always avaible with any table selection. Click on the Table Explorer button to the right of the table selection and a Table Explorer window will open.
Data Mapper Configuration
The Data Mapper is used to map columns from the source data to the target data table.
Inspection and Populating the Mapper
Using the Inspect Source menu button provides additional ways to map columns from source to target:
- Populate Both Mapping Tables: Propagates all values from the source data table into the target data table. This is done by default.
- Populate Source Mapping Table Only: Maps all values in the source data table only. This is helpful when modifying an existing workflow when source column structure has changed.
- Populate Target Mapping Table Only: Propagates all values into the target data table only.
If the source and target column options aren’t enough, other columns can be added into the target data table in several different ways:
- Propagate All will insert all source columns into the target data table, whether they already existed or not.
- Propagate Selected will insert selected source column(s) only.
- Right click on target side and select Insert Row to insert a row immediately above the currently selected row.
- Right click on target side and select Append Row to insert a row at the bottom (far right) of the target data table.
Deleting Columns
To delete columns from the target data table, select the desired column(s), then right click and select Delete.
Changing Column Order
To rearrange columns in the target data table, select the desired column(s). You can use either:
- Bulk Move Arrows: Select the desired move option from the arrows in the upper right
- Context Menu: Right clikc and select Move to Top, Move Up, Move Down, or Move to Bottom.
Reduce Result to Distinct Records Only
To return only distinct options, select the Distinct menu option. This will toggle a set of checkboxes for each column in the source. Simply check any box next to the corresponding column to return only distinct results.
Depending on the situation, you may want to consider use of Summarization instead.
The distinct process retains the first unique record found and discards the rest. You may want to apply a sort on the data if it is important for consistency between runs.
Aggregation and Grouping
To aggregate results, select the Summarize menu option. This will toggle a set of select boxes for each column in the target data table. Choose an appropriate summarization method for each column.
- Group By
- Sum
- Min
- Max
- First
- Last
- Count
- Count (including nulls)
- Mean
- Standard Deviation
- Sample Standard Deviation
- Population Standard Deviation
- Variance
- Sample Variance
- Population Variance
- Advanced Non-Group_By
For advanced data mapper usage such as expressions, cleaning, and constants, please see the Advanced Data Mapper Usage
To allow for maximum flexibility, data filters are available on the source data and the target data. For larger data sets, it can be especially beneficial to filter out rows on the source so the remaining operations are performed on a smaller data set.
Select Subset Of Data
This filter type provides a way to filter the inbound source data based on the specified conditions.
Apply Secondary Filter To Result Data
This filter type provides a way to apply a filter to the post-transformed result data based on the specified conditions. The ability to apply a filter on the post-transformed result allows for exclusions based on results of complex calcuations, summarizaitons, or window functions.
Final Data Table Slicing (Limit)
The row slicing capability provides the ability to limit the rows in the result set based on a range and starting point.
Filter Syntax
The filter syntax utilizes Python SQLAlchemy which is the same syntax as other expressions.
View examples and expression functions in the Expressions area.
14 - Import SPSS
Description
Import SPSS sav and zsav files from PlaidCloud Document.
Examples
No examples yet...
Unique Configuration Items
None
Common Configuration Items
Remove non-ASCII Characters Option
By selecting this option, the import will remove any content that is not ASCII. While PlaidCloud fully supports Unicode (UTF-8), real-world files can contain all sorts of encodings and stray characters that make them challenging to process.
If the content of the file is expected to be ASCII only, checking this box will help ensure the import process runs smoothly.
Delete Files After Import Option
This option will allow the import process to delete the file from the PlaidCloud Document account after a successful import has completed.
This can be useful if the import files are generated can be recreated from a system of record or there is no reason to retain the raw input files once they have been processed.
Import File Selector
The file selector in this transform allows you to choose a file stored in a PlaidCloud Document location for import.
You can also choose a directory to import and all files within that directory will be imported as part of the transform run.
Selecting a Document Account
Choose a PlaidCloud Document account for which you have access. This will provide you with the ability to select a directory or file in the next selection.
Search Option
The Search option allows for finding all matching files below a specified directory path to import. This can be particularly useful if many files need to be included but they are stored in nested directories or are mixed in with other files within the same directory which you do not want to import.
The search path selected is the starting directory to search under. The search process will look for all files within that directory as well as sub-directories that match the search conditions specified. Ensure the search criteria can be applied to the files within the sub-directories too.
The search can be applied using the following conditions:
- Exact: Match the search text exactly
- Starts With: Match any file that starts with the search text
- Contains: Match any file that contains the search text
- Ends With: Match any file that ends with the search text
File or Directory Selection Option
When a specific file or directory of files are required for import, picking the file or directory is a better option than using search.
To select the file or directory, simply use the browse button to pick the path for the Document account selected above.
Variable Substition
For both the search option and specific file/directory option, variables can be used with in the path, search text, and file names.
An example that uses the current_month variable to dynamically point to the correct file:
legal_entity/inputs/{current_month}/ledger_values.csv
Target Table
The target selection for imports is limited to tables only since views do not contain underlying data.
Dynamic Option
The Dynamic option allows specification of a table using text, including variables. This is useful when employing variable driven workflows where table and view references are relative to the variables specified.
An example that uses the current_month variable to dynamically point to target table:
legal_entity/inputs/{current_month}/ledger_values
Static Option
When a specific table is desired as the target for the import, leave the Dynamic box unchecked and select the target Table.
If the target Table does not exist, select the Create new table button to create the table in the desired location.
Table Explorer is always avaible with any table selection. Click on the Table Explorer button to the right of the table selection and a Table Explorer window will open.
Data Mapper Configuration
The Data Mapper is used to map columns from the source data to the target data table.
Inspection and Populating the Mapper
Using the Inspect Source menu button provides additional ways to map columns from source to target:
- Populate Both Mapping Tables: Propagates all values from the source data table into the target data table. This is done by default.
- Populate Source Mapping Table Only: Maps all values in the source data table only. This is helpful when modifying an existing workflow when source column structure has changed.
- Populate Target Mapping Table Only: Propagates all values into the target data table only.
If the source and target column options aren’t enough, other columns can be added into the target data table in several different ways:
- Propagate All will insert all source columns into the target data table, whether they already existed or not.
- Propagate Selected will insert selected source column(s) only.
- Right click on target side and select Insert Row to insert a row immediately above the currently selected row.
- Right click on target side and select Append Row to insert a row at the bottom (far right) of the target data table.
Deleting Columns
To delete columns from the target data table, select the desired column(s), then right click and select Delete.
Changing Column Order
To rearrange columns in the target data table, select the desired column(s). You can use either:
- Bulk Move Arrows: Select the desired move option from the arrows in the upper right
- Context Menu: Right clikc and select Move to Top, Move Up, Move Down, or Move to Bottom.
Reduce Result to Distinct Records Only
To return only distinct options, select the Distinct menu option. This will toggle a set of checkboxes for each column in the source. Simply check any box next to the corresponding column to return only distinct results.
Depending on the situation, you may want to consider use of Summarization instead.
The distinct process retains the first unique record found and discards the rest. You may want to apply a sort on the data if it is important for consistency between runs.
Aggregation and Grouping
To aggregate results, select the Summarize menu option. This will toggle a set of select boxes for each column in the target data table. Choose an appropriate summarization method for each column.
- Group By
- Sum
- Min
- Max
- First
- Last
- Count
- Count (including nulls)
- Mean
- Standard Deviation
- Sample Standard Deviation
- Population Standard Deviation
- Variance
- Sample Variance
- Population Variance
- Advanced Non-Group_By
For advanced data mapper usage such as expressions, cleaning, and constants, please see the Advanced Data Mapper Usage
To allow for maximum flexibility, data filters are available on the source data and the target data. For larger data sets, it can be especially beneficial to filter out rows on the source so the remaining operations are performed on a smaller data set.
Select Subset Of Data
This filter type provides a way to filter the inbound source data based on the specified conditions.
Apply Secondary Filter To Result Data
This filter type provides a way to apply a filter to the post-transformed result data based on the specified conditions. The ability to apply a filter on the post-transformed result allows for exclusions based on results of complex calcuations, summarizaitons, or window functions.
Final Data Table Slicing (Limit)
The row slicing capability provides the ability to limit the rows in the result set based on a range and starting point.
Filter Syntax
The filter syntax utilizes Python SQLAlchemy which is the same syntax as other expressions.
View examples and expression functions in the Expressions area.
15 - Import SQL
Description
Import data from a remote SQL database.
Import Parameters
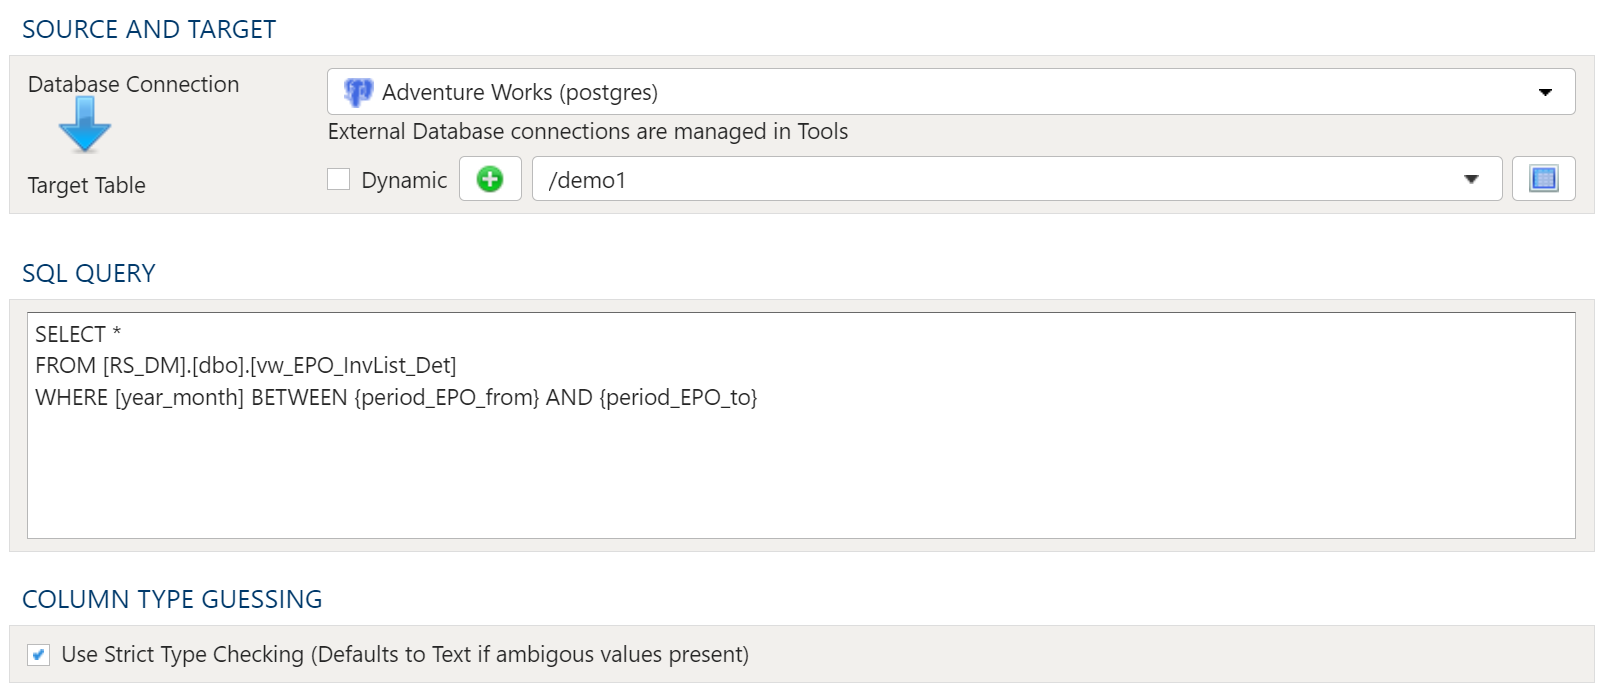
Source And Target
Database Connection
To establish a Database Connection please refer to PlaidCloud Data Connections
Target Table
The target selection for imports is limited to tables only since views do not contain underlying data.
Dynamic Option
The Dynamic option allows specification of a table using text, including variables. This is useful when employing variable driven workflows where table and view references are relative to the variables specified.
An example that uses the current_month variable to dynamically point to target table:
legal_entity/inputs/{current_month}/ledger_values
Static Option
When a specific table is desired as the target for the import, leave the Dynamic box unchecked and select the target Table.
If the target Table does not exist, select the Create new table button to create the table in the desired location.
Table Explorer is always avaible with any table selection. Click on the Table Explorer button to the right of the table selection and a Table Explorer window will open.
SQL Query
In this section write the SQL query to return the required data.
Column Type Guessing
SQL Imports have the option of attempting to guess the data type during load, or to set all columns to type Text. Setting the data types dynamically can be quicker if the data is clean, but can cause issues in some circumstances.
For example, if most of the data appears to be numeric but there is some text as well, it may try to set it as numeric causing load issues with mismatched data types. Or there could be issues if there is a numeric product code that is 16 digits, for example. It would crop the leading zeroes resulting in a number instead of a 16 digit code.
Setting the data to all text, however, requires a subsequent Extract step to convert any data types that shouldn't be text to the appropriate type, like dates or numerical values.
16 - Import Stata
Description
Import Stata files from PlaidCloud Document.
Examples
No examples yet...
Unique Configuration Items
None
Common Configuration Items
Remove non-ASCII Characters Option
By selecting this option, the import will remove any content that is not ASCII. While PlaidCloud fully supports Unicode (UTF-8), real-world files can contain all sorts of encodings and stray characters that make them challenging to process.
If the content of the file is expected to be ASCII only, checking this box will help ensure the import process runs smoothly.
Delete Files After Import Option
This option will allow the import process to delete the file from the PlaidCloud Document account after a successful import has completed.
This can be useful if the import files are generated can be recreated from a system of record or there is no reason to retain the raw input files once they have been processed.
Import File Selector
The file selector in this transform allows you to choose a file stored in a PlaidCloud Document location for import.
You can also choose a directory to import and all files within that directory will be imported as part of the transform run.
Selecting a Document Account
Choose a PlaidCloud Document account for which you have access. This will provide you with the ability to select a directory or file in the next selection.
Search Option
The Search option allows for finding all matching files below a specified directory path to import. This can be particularly useful if many files need to be included but they are stored in nested directories or are mixed in with other files within the same directory which you do not want to import.
The search path selected is the starting directory to search under. The search process will look for all files within that directory as well as sub-directories that match the search conditions specified. Ensure the search criteria can be applied to the files within the sub-directories too.
The search can be applied using the following conditions:
- Exact: Match the search text exactly
- Starts With: Match any file that starts with the search text
- Contains: Match any file that contains the search text
- Ends With: Match any file that ends with the search text
File or Directory Selection Option
When a specific file or directory of files are required for import, picking the file or directory is a better option than using search.
To select the file or directory, simply use the browse button to pick the path for the Document account selected above.
Variable Substition
For both the search option and specific file/directory option, variables can be used with in the path, search text, and file names.
An example that uses the current_month variable to dynamically point to the correct file:
legal_entity/inputs/{current_month}/ledger_values.csv
Target Table
The target selection for imports is limited to tables only since views do not contain underlying data.
Dynamic Option
The Dynamic option allows specification of a table using text, including variables. This is useful when employing variable driven workflows where table and view references are relative to the variables specified.
An example that uses the current_month variable to dynamically point to target table:
legal_entity/inputs/{current_month}/ledger_values
Static Option
When a specific table is desired as the target for the import, leave the Dynamic box unchecked and select the target Table.
If the target Table does not exist, select the Create new table button to create the table in the desired location.
Table Explorer is always avaible with any table selection. Click on the Table Explorer button to the right of the table selection and a Table Explorer window will open.
Data Mapper Configuration
The Data Mapper is used to map columns from the source data to the target data table.
Inspection and Populating the Mapper
Using the Inspect Source menu button provides additional ways to map columns from source to target:
- Populate Both Mapping Tables: Propagates all values from the source data table into the target data table. This is done by default.
- Populate Source Mapping Table Only: Maps all values in the source data table only. This is helpful when modifying an existing workflow when source column structure has changed.
- Populate Target Mapping Table Only: Propagates all values into the target data table only.
If the source and target column options aren’t enough, other columns can be added into the target data table in several different ways:
- Propagate All will insert all source columns into the target data table, whether they already existed or not.
- Propagate Selected will insert selected source column(s) only.
- Right click on target side and select Insert Row to insert a row immediately above the currently selected row.
- Right click on target side and select Append Row to insert a row at the bottom (far right) of the target data table.
Deleting Columns
To delete columns from the target data table, select the desired column(s), then right click and select Delete.
Changing Column Order
To rearrange columns in the target data table, select the desired column(s). You can use either:
- Bulk Move Arrows: Select the desired move option from the arrows in the upper right
- Context Menu: Right clikc and select Move to Top, Move Up, Move Down, or Move to Bottom.
Reduce Result to Distinct Records Only
To return only distinct options, select the Distinct menu option. This will toggle a set of checkboxes for each column in the source. Simply check any box next to the corresponding column to return only distinct results.
Depending on the situation, you may want to consider use of Summarization instead.
The distinct process retains the first unique record found and discards the rest. You may want to apply a sort on the data if it is important for consistency between runs.
Aggregation and Grouping
To aggregate results, select the Summarize menu option. This will toggle a set of select boxes for each column in the target data table. Choose an appropriate summarization method for each column.
- Group By
- Sum
- Min
- Max
- First
- Last
- Count
- Count (including nulls)
- Mean
- Standard Deviation
- Sample Standard Deviation
- Population Standard Deviation
- Variance
- Sample Variance
- Population Variance
- Advanced Non-Group_By
For advanced data mapper usage such as expressions, cleaning, and constants, please see the Advanced Data Mapper Usage
To allow for maximum flexibility, data filters are available on the source data and the target data. For larger data sets, it can be especially beneficial to filter out rows on the source so the remaining operations are performed on a smaller data set.
Select Subset Of Data
This filter type provides a way to filter the inbound source data based on the specified conditions.
Apply Secondary Filter To Result Data
This filter type provides a way to apply a filter to the post-transformed result data based on the specified conditions. The ability to apply a filter on the post-transformed result allows for exclusions based on results of complex calcuations, summarizaitons, or window functions.
Final Data Table Slicing (Limit)
The row slicing capability provides the ability to limit the rows in the result set based on a range and starting point.
Filter Syntax
The filter syntax utilizes Python SQLAlchemy which is the same syntax as other expressions.
View examples and expression functions in the Expressions area.
17 - Import XML
Description
Import XML data as an XML file.
Examples
No examples yet...
Unique Configuration Items
None
Common Configuration Items
Remove non-ASCII Characters Option
By selecting this option, the import will remove any content that is not ASCII. While PlaidCloud fully supports Unicode (UTF-8), real-world files can contain all sorts of encodings and stray characters that make them challenging to process.
If the content of the file is expected to be ASCII only, checking this box will help ensure the import process runs smoothly.
Delete Files After Import Option
This option will allow the import process to delete the file from the PlaidCloud Document account after a successful import has completed.
This can be useful if the import files are generated can be recreated from a system of record or there is no reason to retain the raw input files once they have been processed.
Import File Selector
The file selector in this transform allows you to choose a file stored in a PlaidCloud Document location for import.
You can also choose a directory to import and all files within that directory will be imported as part of the transform run.
Selecting a Document Account
Choose a PlaidCloud Document account for which you have access. This will provide you with the ability to select a directory or file in the next selection.
Search Option
The Search option allows for finding all matching files below a specified directory path to import. This can be particularly useful if many files need to be included but they are stored in nested directories or are mixed in with other files within the same directory which you do not want to import.
The search path selected is the starting directory to search under. The search process will look for all files within that directory as well as sub-directories that match the search conditions specified. Ensure the search criteria can be applied to the files within the sub-directories too.
The search can be applied using the following conditions:
- Exact: Match the search text exactly
- Starts With: Match any file that starts with the search text
- Contains: Match any file that contains the search text
- Ends With: Match any file that ends with the search text
File or Directory Selection Option
When a specific file or directory of files are required for import, picking the file or directory is a better option than using search.
To select the file or directory, simply use the browse button to pick the path for the Document account selected above.
Variable Substition
For both the search option and specific file/directory option, variables can be used with in the path, search text, and file names.
An example that uses the current_month variable to dynamically point to the correct file:
legal_entity/inputs/{current_month}/ledger_values.csv
Target Table
The target selection for imports is limited to tables only since views do not contain underlying data.
Dynamic Option
The Dynamic option allows specification of a table using text, including variables. This is useful when employing variable driven workflows where table and view references are relative to the variables specified.
An example that uses the current_month variable to dynamically point to target table:
legal_entity/inputs/{current_month}/ledger_values
Static Option
When a specific table is desired as the target for the import, leave the Dynamic box unchecked and select the target Table.
If the target Table does not exist, select the Create new table button to create the table in the desired location.
Table Explorer is always avaible with any table selection. Click on the Table Explorer button to the right of the table selection and a Table Explorer window will open.
Data Mapper Configuration
The Data Mapper is used to map columns from the source data to the target data table.
Inspection and Populating the Mapper
Using the Inspect Source menu button provides additional ways to map columns from source to target:
- Populate Both Mapping Tables: Propagates all values from the source data table into the target data table. This is done by default.
- Populate Source Mapping Table Only: Maps all values in the source data table only. This is helpful when modifying an existing workflow when source column structure has changed.
- Populate Target Mapping Table Only: Propagates all values into the target data table only.
If the source and target column options aren’t enough, other columns can be added into the target data table in several different ways:
- Propagate All will insert all source columns into the target data table, whether they already existed or not.
- Propagate Selected will insert selected source column(s) only.
- Right click on target side and select Insert Row to insert a row immediately above the currently selected row.
- Right click on target side and select Append Row to insert a row at the bottom (far right) of the target data table.
Deleting Columns
To delete columns from the target data table, select the desired column(s), then right click and select Delete.
Changing Column Order
To rearrange columns in the target data table, select the desired column(s). You can use either:
- Bulk Move Arrows: Select the desired move option from the arrows in the upper right
- Context Menu: Right clikc and select Move to Top, Move Up, Move Down, or Move to Bottom.
Reduce Result to Distinct Records Only
To return only distinct options, select the Distinct menu option. This will toggle a set of checkboxes for each column in the source. Simply check any box next to the corresponding column to return only distinct results.
Depending on the situation, you may want to consider use of Summarization instead.
The distinct process retains the first unique record found and discards the rest. You may want to apply a sort on the data if it is important for consistency between runs.
Aggregation and Grouping
To aggregate results, select the Summarize menu option. This will toggle a set of select boxes for each column in the target data table. Choose an appropriate summarization method for each column.
- Group By
- Sum
- Min
- Max
- First
- Last
- Count
- Count (including nulls)
- Mean
- Standard Deviation
- Sample Standard Deviation
- Population Standard Deviation
- Variance
- Sample Variance
- Population Variance
- Advanced Non-Group_By
For advanced data mapper usage such as expressions, cleaning, and constants, please see the Advanced Data Mapper Usage
To allow for maximum flexibility, data filters are available on the source data and the target data. For larger data sets, it can be especially beneficial to filter out rows on the source so the remaining operations are performed on a smaller data set.
Select Subset Of Data
This filter type provides a way to filter the inbound source data based on the specified conditions.
Apply Secondary Filter To Result Data
This filter type provides a way to apply a filter to the post-transformed result data based on the specified conditions. The ability to apply a filter on the post-transformed result allows for exclusions based on results of complex calcuations, summarizaitons, or window functions.
Final Data Table Slicing (Limit)
The row slicing capability provides the ability to limit the rows in the result set based on a range and starting point.
Filter Syntax
The filter syntax utilizes Python SQLAlchemy which is the same syntax as other expressions.
View examples and expression functions in the Expressions area.